Essential Aspects of Staining Old Oak Kitchen Cabinets
Reviving aged oak kitchen cabinets through staining can restore their charm and enhance their aesthetic appeal. This detailed guide will delve into the critical aspects of staining old oak cabinets, providing you with the knowledge and techniques to achieve a flawless finish.
1. Preparation:
Thorough preparation is paramount. Remove all hardware, doors, and drawers. Clean the cabinet surfaces meticulously with a degreaser to eliminate dirt, grease, and any previous finish. Sand the cabinets lightly with fine-grit sandpaper, removing any existing stains or blemishes.
2. Stain Selection:
Choose a stain that complements your desired look and the existing grain patterns of the oak. Test the stain on an inconspicuous area first to ensure it meets your expectations. Oil-based stains penetrate deeply, providing rich color and durability. Water-based stains are easier to apply, dry quickly, and allow for more precise control of the color intensity.
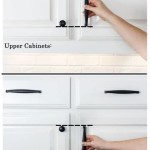
3. Application Techniques:
Apply the stain using a clean brush or sponge. Follow the grain direction and work in small sections. Brush on a thin, even coat, avoiding excessive dripping. Allow the first coat to dry completely before applying a second or third coat to achieve the desired darkness. Always allow ample drying time between coats.
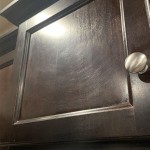
4. Ragging:
Ragging involves wiping away excess stain with a lint-free cloth while the stain is still wet. This technique creates a more variegated and distressed appearance, highlighting the natural grain patterns of the oak. Different types of fabrics and application methods can result in unique effects.
5. Finishing:
After the stain has fully dried, protect the finish with a clear topcoat. Polyurethane, lacquer, or wax are all suitable options. Polyurethane provides excellent durability and water resistance. Lacquer dries quickly and produces a high-gloss finish. Wax enhances the warmth of the wood and offers a natural matte finish.
6. De-Glossing:
For a more aged appearance, consider de-glossing the finish. This involves rubbing the surface with fine-grit steel wool or sandpaper. De-glossing removes the sheen, creating a more rustic and weathered look.
7. Aging Techniques:
Various aging techniques can create the illusion of age and patina. Glazing involves applying a thin layer of dark paint or stain over the existing finish, then wiping it away to reveal hints of color in the recesses. Distressing consists of using sandpaper or a scraping tool to create intentional nicks and dents.
Conclusion:
Staining old oak kitchen cabinets requires careful preparation, precise application, and attention to detail. By following these essential aspects, you can achieve a stunning transformation that restores the beauty and character of your aged oak cabinets.

How To Stain Oak Cabinetry Tutorial The Kim Six Fix

Staining Your Wood Cabinets Darker Young House Love

Diy Staining Oak Cabinets Eclectic Spark

Refinishing Kitchen Cabinets Modern Refacing Made Easy Wisewood

Staining Kitchen Cabinets Pictures Ideas Tips From

Tips And Ideas How To Update Oak Or Wood Cabinets Paint Stain More

How I Updated My Oak Cabinets Without Paint By Using Briwax Easy Budget Kitchen Makeover Only 24

Kitchen Renovation How To Mix White And Stained Oak Cabinets Home Bunch Interior Design Ideas

How To Stain Dark Or Yellow Kitchen Cabinets Lighter

Refinish Kitchen Cabinets Without Stripping
Related Posts