Staining Unfinished Kitchen Cabinets: A Comprehensive Guide
Unfinished kitchen cabinets offer a blank canvas for homeowners seeking to personalize their kitchen space. Staining, in particular, is a popular choice because it enhances the natural wood grain and allows for a wide range of color options to complement any design aesthetic. However, successfully staining unfinished cabinets requires careful planning, meticulous preparation, and the application of proper techniques. This article provides a comprehensive guide to staining unfinished kitchen cabinets, covering everything from selecting the right materials to achieving a professional-quality finish.
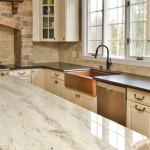
The appeal of unfinished cabinets lies in their affordability and versatility. They are typically less expensive than pre-finished cabinets and offer the opportunity to create a custom look that reflects individual preferences. Staining allows the homeowner to choose the exact shade and tone that will best complement the kitchen's overall design scheme, from light and airy contemporary styles to rich and traditional looks. The process, while demanding in terms of attention to detail, is achievable for many DIY enthusiasts with the proper knowledge and tools.
Key Point 1: Preparation is Paramount
The success of any staining project hinges on thorough preparation. Neglecting this crucial step can result in uneven color absorption, blotchy finishes, and a generally unprofessional appearance. The preparation process involves several key steps, each designed to create a smooth, clean, and receptive surface for the stain.
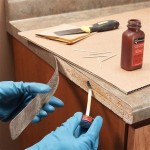
Firstly, a meticulous inspection of the unfinished cabinets is essential. Look for any imperfections such as dents, scratches, or glue residue. These defects, if left unattended, will become more pronounced after staining. Small dents can sometimes be raised with a damp cloth and an iron. Deeper scratches or gouges may require filling with a wood filler that is specifically designed to be stained. Ensure that the wood filler is completely dry and sanded smooth before proceeding. Glue residue should be carefully removed with a scraper or specialized glue remover, avoiding any damage to the wood surface.
Sanding is arguably the most critical step in the preparation process. The purpose of sanding is to create a smooth, uniform surface that will evenly accept the stain. Start with a coarser grit sandpaper, typically around 120-grit, to remove any imperfections and smooth out any rough areas. Gradually move to finer grits, such as 180-grit and then 220-grit, to refine the surface and create a polished feel. Always sand in the direction of the wood grain to avoid creating unsightly scratches. Pay particular attention to edges and corners, as these areas are prone to splintering and uneven sanding.
After sanding, it is crucial to remove all traces of sanding dust. Use a vacuum cleaner with a brush attachment to thoroughly remove dust from the cabinets, including crevices and corners. Follow up with a tack cloth, a slightly sticky cloth specifically designed to pick up fine dust particles. Tack cloths are available at most hardware stores and are an indispensable tool for achieving a clean and dust-free surface. A final wipe down with a clean, lint-free cloth can further ensure that the surface is free of any contaminants that could interfere with the stain.
Some wood species, particularly softwoods like pine, may benefit from the application of a wood conditioner before staining. Wood conditioner helps to even out the wood's porosity, preventing the stain from being absorbed unevenly and resulting in a blotchy finish. Apply the wood conditioner according to the manufacturer's instructions, typically by brushing or wiping it onto the surface and allowing it to soak in for a specified period before wiping off any excess. Allow the wood conditioner to dry completely before proceeding with the staining process.
Key Point 2: Selecting the Right Stain and Application Technique
Choosing the right stain and application technique is crucial for achieving the desired color and finish. There are several types of wood stains available, each with its own unique characteristics and application requirements. The choice of stain will depend on the type of wood, the desired color, and the level of durability required.
Oil-based stains are a popular choice for their rich color and durability. They penetrate deeply into the wood, providing excellent protection against moisture and wear. Oil-based stains typically offer a longer open time, allowing for more flexibility during application. However, they also require longer drying times and require mineral spirits for cleanup. Water-based stains are a more environmentally friendly option, with lower VOC (volatile organic compounds) emissions. They dry faster than oil-based stains and are easier to clean up with soap and water. However, water-based stains may not penetrate as deeply as oil-based stains and may require multiple coats to achieve the desired color intensity.
Gel stains are a thicker, more viscous type of stain that is particularly well-suited for staining woods that are prone to blotching, such as pine or maple. Gel stains sit on the surface of the wood rather than penetrating deeply, creating a more uniform color. They are also a good choice for staining non-wood surfaces, such as veneer or fiberglass. Stain-and-polyurethane combinations offer the convenience of staining and sealing in one step. These products are typically less durable than separate stain and polyurethane applications, but they can be a good option for projects where time is a constraint.
The application technique is equally important as the choice of stain. There are several methods for applying stain, including brushing, wiping, and spraying. Brushing is a traditional method that is well-suited for applying stain to large, flat surfaces. Use a natural-bristle brush for oil-based stains and a synthetic-bristle brush for water-based stains. Apply the stain in the direction of the wood grain, using long, even strokes. Wiping is a popular method for achieving a more controlled color and preventing blotching. Apply the stain with a brush or rag, then immediately wipe off the excess with a clean, lint-free cloth. This technique allows you to build up the color gradually and achieve a more uniform finish. Spraying provides the most even and consistent coverage, but it requires specialized equipment, such as a paint sprayer. Spraying is best suited for complex shapes or large projects.
Regardless of the application method, it is crucial to apply the stain in thin, even coats. Avoid applying too much stain at once, as this can lead to drips, runs, and uneven color. Allow each coat of stain to dry completely before applying the next coat. Refer to the manufacturer's instructions for specific drying times.
Key Point 3: Applying a Protective Finish
Once the stain has dried completely, it is essential to apply a protective finish to seal the wood and protect it from moisture, scratches, and wear. Polyurethane is a popular choice for its durability and resistance to water and chemicals. There are two main types of polyurethane: oil-based and water-based. Oil-based polyurethane provides a durable, amber-toned finish. Water-based polyurethane dries clear and does not yellow over time, making it a good choice for lighter-colored stains. Polyacrylic is another option that offers similar benefits to water-based polyurethane, but it is even more resistant to yellowing.
Before applying the finish, lightly sand the stained surface with a fine-grit sandpaper, such as 320-grit, to create a smooth surface for the finish to adhere to. Remove all sanding dust with a vacuum cleaner and tack cloth. Apply the finish in thin, even coats, using a brush, roller, or sprayer. Follow the manufacturer's instructions for application and drying times. Allow each coat of finish to dry completely before applying the next coat. Sand lightly between coats with a fine-grit sandpaper to remove any imperfections and create a smooth surface.
For kitchen cabinets, it is recommended to apply at least two to three coats of finish for maximum protection. Pay particular attention to areas that are prone to wear and tear, such as the edges and corners of the doors and drawers. After the final coat of finish has dried completely, allow it to cure for several days before using the cabinets. This will allow the finish to harden and become more resistant to scratches and damage.
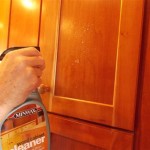
Maintaining stained kitchen cabinets requires regular cleaning and care. Wipe down the cabinets regularly with a damp cloth to remove dust and dirt. Avoid using harsh cleaning chemicals or abrasive cleaners, as these can damage the finish. For stubborn stains, use a mild soap and water solution. Periodically, you may need to reapply a coat of finish to maintain the protection and luster of the cabinets. Following these guidelines will help to ensure that your stained kitchen cabinets remain beautiful and functional for years to come.

How To Stain Unfinished Cabinets Painting By The Penny

Stain Unfinished Cabinets Popular Traditional Kitchen Design Cabinet Door Styles Staining

How To Stain Unfinished Cabinets Painting By The Penny

How To Stain Unfinished Cabinets Painting By The Penny

Kitchen Renovation Unfinished Oak Cabinets

How To Make Rustic Kitchen Cabinets By Refinishing Them The Best Stain Color Amanda Katherine

How To Finish Wood Cabinets Cabinet Doors N More

Unfinished Cabinets Pros Cons And Guide

How To Stain Oak Cabinetry Tutorial The Kim Six Fix

Kitchen Renovation Unfinished Oak Cabinets
Related Posts