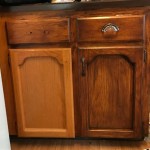
Stripping Oak Kitchen Cabinets: A Comprehensive Guide
In the realm of home renovation, transforming oak kitchen cabinets can significantly elevate the aesthetics of your space. Stripping oak cabinets is a rewarding yet meticulous process that requires careful planning and execution. This article will provide you with a comprehensive guide to stripping oak kitchen cabinets, ensuring a professional-looking finish that will enhance the beauty of your kitchen.
1. Preparation
Before embarking on the stripping process, thorough preparation is essential. Remove all cabinet doors and drawers. Label each piece to facilitate reassembly later on. Protect surrounding surfaces from potential chemical spills using drop cloths or plastic sheeting.
2. Safety Precautions
Chemical strippers can be hazardous. Wear protective gear, including gloves, safety glasses, and a respirator, to ensure your safety. Work in a well-ventilated area or outdoors.
3. Chemical Strippers
Choosing the right chemical stripper is crucial. Gel strippers are recommended for vertical surfaces as they stay in place longer than liquid strippers. Apply a thick, even coat of stripper to the cabinet surface using a brush or roller. Allow the stripper to dwell for the recommended time, typically 15-30 minutes.
4. Stripping the Finish
Once the stripper has had sufficient time to work, use a plastic or nylon scraper to remove the softened finish. Be gentle to avoid damaging the wood. Work in small sections and rinse the scraper frequently to prevent transferring the removed finish to other areas.
5. Neutralizing the Stripper
After stripping the finish, it is essential to neutralize any residual stripper. Use a solution of Denatured Alcohol and water (50:50 ratio). Apply the solution and wipe down the surface using a clean cloth.
6. Sanding
To achieve a smooth, even surface, sanding is necessary. Start with coarse-grit sandpaper (80-120 grit) to remove any remaining finish or unevenness. Gradually progress to finer-grit sandpaper (180-220 grit) for a smoother finish.
7. Cleaning and Staining
Before staining or painting the cabinets, thoroughly clean the surface with a tack cloth or mineral spirits. Choose a stain or paint that complements your kitchen decor and apply it according to the manufacturer's instructions.
8. Reassembly
Once the stain or paint has dried completely, reassemble the cabinet doors and drawers. Use wood screws or cabinet hinges to secure them in place.
Conclusion
Stripping oak kitchen cabinets can be a transformative project that enhances the beauty and value of your home. By following the steps outlined in this guide and taking the necessary safety precautions, you can achieve a professional-looking finish that will impress for years to come. With careful preparation and execution, you can breathe new life into your oak kitchen cabinets and create a space that is both functional and aesthetically pleasing.

Refinishing Kitchen Cabinets Modern Refacing Made Easy Wisewood

How To Make Rustic Kitchen Cabinets By Refinishing Them The Best Stain Color Amanda Katherine

Cabinet Refinishing Guide

Diy Staining Oak Cabinets Eclectic Spark

Should I Paint Or Refinish My Kitchen Cabinets
/102182203-4cf08265c33b4c4e88fb21315a8fe626.jpg?strip=all "Our Step By Guide To Beautiful Stained Wood Cabinets")
Our Step By Guide To Beautiful Stained Wood Cabinets

How To Stain Dark Or Yellow Kitchen Cabinets Lighter

Tips Tricks To Paint Honey Oak Kitchen Cabinets Cottage Living And Style

Should I Paint Or Refinish My Kitchen Cabinets

Tips And Ideas How To Update Oak Or Wood Cabinets Paint Stain More
Related Posts