Taking Down Kitchen Cabinets: A Comprehensive Guide
Removing kitchen cabinets is a common project undertaken during kitchen renovations, remodels, or simply when replacing outdated cabinetry. While seemingly straightforward, the process requires careful planning, the right tools, and a methodical approach to avoid damaging surrounding walls, appliances, or the cabinets themselves, especially if they are to be reused or repurposed. This article provides a detailed guide on how to safely and effectively remove kitchen cabinets, covering preparation, the removal process, and what to expect during each stage.
Before commencing the removal, a thorough assessment of the existing cabinet installation is crucial. This involves identifying the type of cabinet construction, how the cabinets are attached to the walls and each other, and the location of any hidden utilities or plumbing. Modern cabinets are typically attached directly to studs in the wall, while older installations might involve furring strips or additional support structures. Understanding these factors will inform the choice of tools and the sequence of removal.
Safety is paramount throughout the entire removal process. Eye protection, gloves, and a dust mask are essential to protect against flying debris, sharp edges, and potential irritants like mold or dust. Additionally, it's advisable to wear sturdy footwear to avoid injuries from dropped objects. If the cabinets are particularly heavy or awkwardly positioned, enlisting the help of another person is highly recommended to prevent strain or accidents.
Key Point 1: Preparation is Essential for a Successful Removal
Proper preparation is the cornerstone of a successful cabinet removal project. It minimizes the risk of damage, ensures a smoother workflow, and contributes to a safer work environment. This phase involves several critical steps, including clearing the workspace, gathering necessary tools, and carefully inspecting the cabinet installation.
The first step is to completely clear the kitchen workspace. This means removing all items from the countertops, the insides of the cabinets, and the surrounding areas. Appliances that might be nearby, such as the refrigerator, stove, or dishwasher, should be moved or adequately protected with drop cloths or protective sheeting. This prevents accidental damage during the removal process and provides ample room to maneuver.
Next, gather all the necessary tools. A basic toolkit should include: a stud finder (to locate wall studs behind the drywall), a drill or impact driver with various bits (including screwdriver heads and possibly socket adapters), a utility knife, a pry bar, a hammer, a level, a pencil, a measuring tape, safety glasses, gloves, a dust mask, and drop cloths. A reciprocating saw might be necessary if the cabinets are heavily glued or difficult to detach. Having a small container readily available to store screws and hardware as they are removed is also helpful.
Before dismantling anything, perform a thorough inspection of the cabinet installation. Pay close attention to how the cabinets are affixed to the wall and to each other. Look for screws, nails, or adhesive. Note the location of any exposed pipes or electrical wiring that might run behind or within the cabinets. Identify the type of wall construction (drywall, plaster, etc.) as this will affect how the cabinets are anchored. Understanding these details will help you anticipate potential challenges and choose the most appropriate removal techniques.
Turn off the power to any electrical circuits servicing the area where you're working. This is especially important if you suspect there might be electrical wiring behind the cabinets. Locate the circuit breaker that controls the relevant outlets and switches and switch it off. Verify that the power is off by testing the outlets with a voltage tester before proceeding. If you are unsure about how to do this, consult with a qualified electrician.
Finally, protect the floor with drop cloths or cardboard. This will help prevent damage from falling debris or scratches from tools. Secure the drop cloths in place with masking tape to prevent them from shifting during the work.
Key Point 2: The Removal Process: Sequence and Technique
The cabinet removal process should follow a logical sequence to minimize the risk of damage and ensure efficient progress. Typically, the removal begins with the upper cabinets, followed by the lower cabinets. Within each group, start with the outermost cabinets and work your way inward.
For upper cabinets, the first step is to carefully locate the screws that secure the cabinets to the wall studs. Use a stud finder to identify the location of the studs behind the drywall. Mark the stud locations with a pencil. The screws are usually located along the top and bottom rails of the cabinet, where they attach directly to the studs. Use a drill or impact driver with the appropriate screwdriver bit to remove the screws. It is helpful to have an assistant support the cabinet while you remove the screws, especially for larger cabinets. Once all the screws are removed, carefully lift the cabinet off the wall. If the cabinet is stuck, gently use a pry bar to help separate it from the wall. Be careful not to damage the wall in the process.
Before completely removing the cabinet, check for any remaining connections, such as lighting fixtures, or wires passing through the cabinet. Disconnect these carefully before fully detaching the cabinet. If there are wires, ensure the power is off. Cap the wires with wire nuts to prevent electrical hazards.
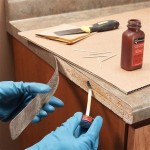
Lower cabinets are typically secured to the wall in a similar manner to upper cabinets, but they may also be attached to the floor or to each other. Start by removing any screws that connect the cabinets to the wall studs. Then, check for screws connecting the cabinets to the floor. These screws may be hidden beneath trim or behind panels. If the cabinets are connected to each other with screws or bolts, remove these as well. If there is a countertop, it might need to be removed before the cabinets can be detached. Countertops are often glued or screwed to the cabinets. Use a utility knife to score along the edges of the countertop where it meets the cabinets to break the glue seal. If the countertop is screwed in place, remove the screws from underneath.
As with the upper cabinets, if the lower cabinets are stuck, use a pry bar to gently separate them from the wall or floor. Be cautious not to damage the surrounding surfaces. If the cabinets are particularly heavy, use a floor jack or other lifting device to help lift them off the floor.
During the removal process, label each cabinet and its corresponding hardware. This will make it easier to reassemble the cabinets if they are being reused, or to dispose of them properly. Use masking tape and a marker to label each cabinet with a unique identifier (e.g., "Upper Left," "Lower Right"). Store the hardware (screws, hinges, handles) in labeled bags or containers.
Key Point 3: Handling Challenges and Unexpected Issues
Even with careful planning and execution, unexpected issues can arise during the cabinet removal process. Addressing these challenges promptly and effectively is crucial to prevent further complications or damage.
One common issue is encountering cabinets that are heavily glued to the wall. This is especially prevalent in older installations. If a pry bar is not sufficient to separate the cabinet from the wall, a reciprocating saw can be used to carefully cut through the adhesive. Use a fine-tooth blade to minimize damage to the wall. Insert the blade between the cabinet and the wall and slowly cut through the glue line. Be careful not to cut through any electrical wiring or plumbing that might be hidden behind the cabinet.
Another potential challenge is dealing with damaged or crumbling drywall. This can occur if the cabinets are heavily attached or if the drywall is old or deteriorated. If the drywall is damaged, it will need to be repaired before new cabinets can be installed. Use drywall compound to fill in any holes or cracks. Sand the compound smooth and prime the wall before painting.
Hidden utilities, such as electrical wiring or plumbing, can also present a significant challenge. If you encounter any unexpected wires or pipes, stop work immediately and assess the situation. If you are not comfortable working with electrical wiring or plumbing, consult with a qualified professional. Do not attempt to move or disconnect any wires or pipes yourself unless you are properly trained and equipped.
If the cabinets are particularly difficult to remove, it is possible that they are attached to a load-bearing wall. Removing a load-bearing wall can have serious structural consequences and should only be done by a qualified contractor or structural engineer. Consult with a professional before removing any cabinets that are attached to a wall that you suspect might be load-bearing.
Finally, be prepared for the possibility that the cabinets themselves might be damaged during the removal process. While careful techniques can minimize the risk of damage, accidents can happen. If a cabinet is damaged, assess the extent of the damage and determine whether it can be repaired or if it needs to be replaced.

Wall Cabinet Pull Down Shelving System Out Kitchen Storage Units Cabinets

Removing Some Kitchen Cabinets Rehanging One Young House Love

Thomasville Organization Wall Cabinet With Pull Down Shelf

Pull Down Cabinet Shelf Organization Diamond

Removing Some Kitchen Cabinets Rehanging One Young House Love

Rev A Shelf 18 87 In H X 34 25 W 10 D Large Wall Cabinet Pull Down Shelving System 5pd 36crn The Home Depot

Pull Down Unit Design Meets Movement

Pull Down Upper Cabinet Kitchen Shelves Cabinets Used

Yorktowne Cabinetry Wall Cabinet Pull Down Shelf

Kitchen Removing Base Cabinet Countertops Backsplash
Related Posts