Taking Doors Off Upper Kitchen Cabinets: A Step-by-Step Guide
Taking doors off upper kitchen cabinets can be a simple task that can make a big impact in the overall look of your kitchen. It can open up the space and make it feel more airy and inviting. The process is relatively straightforward and can be completed in a few minutes with the right tools.
Step 1: Gather Your Tools
Before you begin, you'll need to gather the following tools:
- Phillips head screwdriver
- Flathead screwdriver
- Hammer
- Nail set
- Optional: Safety glasses
Step 2: Remove the Doors
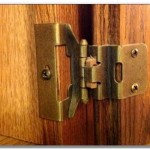
Start by opening the cabinet door and locating the hinges. The hinges will be attached to the door and the cabinet frame with screws. Use the Phillips head screwdriver to remove the screws that attach the hinges to the door.
Once the screws are removed, carefully lift the door off the hinges. Be careful not to drop the door. If you are having trouble lifting the door off the hinges, you can use a flathead screwdriver to gently pry it loose.
Step 3: Remove the Hinges
Now that the doors are off, you can remove the hinges. Use the Phillips head screwdriver to remove the screws that attach the hinges to the cabinet frame. Once the screws are removed, carefully lift the hinges off the frame.
Step 4: Fill the Holes
Once the hinges are removed, you will need to fill the holes. You can do this with wood filler or putty. Apply the wood filler or putty to the holes and smooth it out with your finger. Let the wood filler or putty dry completely.
Step 5: Sand the Holes
Once the wood filler or putty is dry, you can sand the holes to make them smooth. Use a fine-grit sandpaper to sand the holes until they are flush with the surface of the cabinet frame.
Step 6: Paint or Stain the Cabinet
If you are changing the color of the cabinets, you can now paint or stain them. Be sure to follow the manufacturer's instructions for the paint or stain that you are using.
Step 7: Reinstall the Doors
Once the paint or stain is dry, you can reinstall the doors. Place the hinges on the cabinet frame and align the holes with the holes that you filled earlier. Use the Phillips head screwdriver to screw the hinges into place.
Lift the door onto the hinges and align the holes. Use the Phillips head screwdriver to screw the hinges into the door.
Step 8: Adjust the Doors
Once the doors are installed, you may need to adjust them so that they close properly. To adjust the doors, use a Phillips head screwdriver to turn the adjustment screws on the hinges. Turn the screws clockwise to move the door towards the frame and counterclockwise to move the door away from the frame.

Do You Have A Maid And Other Q S About Open Shelving The Inspired Room

Do You Have A Maid And Other Q S About Open Shelving The Inspired Room

Budget Kitchen Remove Doors On Cabinets For Instant Open Shelving Houzz Au

Taking The Doors Off Room To Think

Removing Kitchen Cabinet Doors To Create Open Shelving In My Own Style

Removing Some Kitchen Cabinets Rehanging One Young House Love

Kitchen Cabinet Doors Off Or On Hometalk

Removing Kitchen Cabinet Doors To Create Open Shelving In My Own Style

Kitchen Cabinets Design Dilemma

10 Simple Ideas To Update Your Kitchen Cabinets Jenna Sue Design
Related Posts