Tips for Painting Kitchen Cabinets
Painting kitchen cabinets is a popular and cost-effective way to refresh the look of your kitchen. A new coat of paint can instantly modernize your space, making it feel brighter and more inviting. While it may seem like a daunting task, painting cabinets is manageable with the right preparation and techniques. This article provides a comprehensive guide with tips to ensure a successful and beautiful paint job.
1. Preparation is Key
Proper preparation is crucial for achieving a professional-looking finish. Before even picking up a paintbrush, dedicate ample time for the following steps:
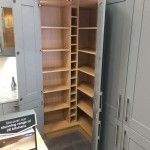
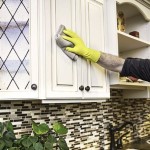
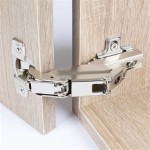
1. Clean Thoroughly: Begin by thoroughly cleaning the cabinets with a degreaser to remove grease, grime, and any residue. Use a mild soap and water solution for regular cleaning then rinse and dry completely. 2. Remove Hardware: Carefully remove all cabinet hardware, including hinges, knobs, and pulls. Keep them organized in labeled bags or containers to avoid losing any parts. 3. Sanding: Sanding helps create a smooth surface for paint adhesion and ensures a smooth final finish. Start with a coarse-grit sandpaper (120-grit) to remove any imperfections or gloss. Follow with a finer-grit sandpaper (220-grit) for a smoother finish. Lightly sand in the direction of the wood grain. 4. Patching: Fill any scratches, dents, or holes with wood filler. Allow the filler to dry completely and then sand it smooth for an even surface. 5. Prime Appropriately: A quality primer is essential for creating a smooth surface for the paint and ensuring proper adhesion. Use a primer formulated for cabinets or kitchen surfaces, as these are designed to withstand the wear and tear of a kitchen environment. Apply the primer evenly with a brush or roller, and allow it to dry completely before moving on to the next step.
2. Choosing the Right Paint
Choosing the right paint is critical for achieving the desired finish and ensuring the longevity of your paint job. Consider the following factors when selecting your paint:
1. Type of Paint: For kitchen cabinets, it's best to use a high-quality, durable paint designed for kitchen use. Choose a paint formulated for cabinet finishes, which often includes a combination of acrylic latex and oil-based ingredients. 2. Finish: Cabinet paint is available in various finishes, such as matte, satin, semi-gloss, and gloss. Matte finishes are best for hiding imperfections but tend to show dirt and scratches more easily. Semi-gloss finishes are durable, easy to wipe clean, and have a subtle shine. Glossy finishes offer the highest level of shine but can highlight imperfections. 3. Color: Consider the color of your kitchen walls and the desired mood you want to create. For a modern look, consider a neutral color like white, gray, or cream. Bold colors can add vibrancy and personality to the space. Sample the colors on your cabinets before making a final decision. 4. Number of Coats: Most cabinet paint requires two coats for optimal coverage and color depth. Apply thin, even coats, allowing each coat to dry completely before applying the next.
3. Painting Techniques for a Smooth Finish
The application process is crucial for a smooth and professional-looking finish.
1. Preparation: Before starting, cover surrounding areas with drop cloths or plastic sheeting to prevent paint spills. Wear a respirator mask and gloves to protect yourself from paint fumes. 2. Painting Style: The preferred painting method (brush, roller, or sprayer) depends on the project's scope and your level of experience.
- Brush: For small projects or achieving precise lines, a high-quality brush is essential. Use a brush with a natural bristle for a smooth finish.
- Roller: Rollers are ideal for larger surfaces, ensuring even coverage. Use a roller with a nap length suitable for the cabinet's surface.
- Sprayer: A paint sprayer can provide a smooth and even finish but requires careful masking and proper ventilation. 3. Application Techniques:
- Start with the Frames: Paint cabinet frames first, followed by doors and drawer fronts.
- Thin Coats: Apply thin, even coats instead of heavy coats to prevent drips and runs.
- Smooth Transitions: When using a brush or roller, blend each stroke with the previous stroke to avoid visible brush marks.
- Drying Time: Allow each coat to dry thoroughly before applying the next coat. 4. Clean Up: Clean your brushes and rollers with the appropriate solvent as recommended by the paint manufacturer. Dispose of paint and packaging responsibly.
4. Post-Painting Refinishing
After the paint has dried completely, you can complete the final steps to enhance the look of your cabinets.
1. Sanding and Cleaning: Lightly sand the painted surfaces with fine-grit sandpaper to smooth out any imperfections and remove any remaining brush strokes. Wipe the cabinets clean with a damp cloth.
2. Hardware Installation: Reinstall cabinet hardware with care, ensuring screws are securely fastened.
3. Protection: Apply a sealant or clear coat to protect the painted surface from scratches and wear. Select a sealant specifically designed for kitchen surfaces.
Painting your kitchen cabinets can be a rewarding project that transforms the entire space. By following these tips and taking your time, you can achieve a professional-looking finish that enhances your kitchen's beauty and functionality for years to come.

How To Paint Kitchen Cabinets

How To Paint Kitchen Cabinets Like The Pros
:strip_icc()/painted-kitchen-cabinet-ideas-20-becca-interiors-southampton-0b04a571a07649deb33edae1e89d9c41.jpeg?strip=all "29 Painted Kitchen Cabinet Ideas You Can Easily Copy")
29 Painted Kitchen Cabinet Ideas You Can Easily Copy
How To Paint Kitchen Cabinets Like The Pros

20 Diy Painted Kichen Cabinet Ideas A Cultivated Nest

6 Tips For Painting Your Kitchen Cabinets

7 Expert Tips For Flawless Kitchen Cabinet Painting

Tips On How To Paint Kitchen Cabinets Cherished Bliss

How To Choose Kitchen Cabinet Paint Colors

Painted Kitchen Cabinets One Year Later The Palette Muse
Related Posts