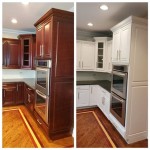
Using Chalk Paint on Oak Kitchen Cabinets
Oak kitchen cabinets are a classic choice, offering durability and a warm, natural aesthetic. However, their traditional look might not align with contemporary design preferences. If you're seeking a refresh for your outdated oak cabinets, chalk paint offers a transformative solution. This versatile paint provides a matte finish, can be applied directly over existing surfaces, and allows for easy distressing, making it an excellent choice for achieving a wide range of styles.
Benefits of Using Chalk Paint on Oak Cabinets
Chalk paint offers several advantages when used to revitalize oak kitchen cabinets:
1.
Easy Application and Coverage:
Chalk paint boasts a forgiving formula that adheres well to various surfaces, including wood. Its thick consistency allows for easy application with a brush, roller, or even a sponge. Additionally, its excellent coverage means fewer coats are typically necessary, minimizing time and effort.2.
Matte Finish and Distressing Potential:
Chalk paint dries to a beautiful matte finish, which complements a range of design styles. Its porous surface readily accepts waxes and varnishes for added protection and sheen. Moreover, chalk paint's texture allows for easy distressing, creating a vintage or farmhouse aesthetic if desired.3.
Versatile Color Options:
Chalk paint is available in a vast array of colors, empowering homeowners to choose the perfect shade for their kitchen. Whether you're seeking a bold statement or a subtle refresh, chalk paint offers the flexibility to achieve your desired look.Preparing the Cabinets for Paint
Before applying chalk paint, ensure your oak cabinets are properly prepared for a smooth and long-lasting finish. The following steps provide a comprehensive guide to ensure successful painting:
1.
Cleaning:
Begin by thoroughly cleaning the cabinets with a degreaser to remove any grease, grime, or wax residue. A mild soap and water mixture can also be used.2.
Sanding:
Lightly sand the cabinet surfaces with fine-grit sandpaper to create a slightly rough texture that will help the chalk paint adhere better. This step is particularly important for glossy finishes.3.
Priming (Optional):
While not always mandatory, applying a primer can enhance adhesion and provide a uniform base for the chalk paint. Use a primer specifically designed for chalk paint or latex-based primers.Applying Chalk Paint
Now that the cabinets are prepped, you can begin applying the chalk paint. Here's a step-by-step guide:
1.
Choose a Brush or Roller:
While both are effective, brushes provide more control for detailed work, while rollers are ideal for larger areas. Consider using a natural bristle brush for a smoother finish.2.
Thin the Paint (Optional):
Thinning the paint with water can provide a slightly smoother finish, especially for multiple coats. Follow the manufacturer's instructions for the appropriate water ratio.3.
Apply the First Coat:
Using long, even strokes, apply the first coat of chalk paint to the cabinets. Ensure the paint is evenly distributed and covers the entire surface. Allow the paint to dry completely before applying subsequent coats.4.
Distressing (Optional):
If you desire a distressed look, use fine-grit sandpaper to lightly rub away the paint in areas that would naturally wear over time, such as corners, edges, and raised areas.5.
Apply Additional Coats (Optional):
If desired, apply another coat of chalk paint after the previous layer has dried. Two coats are typically sufficient for optimal coverage.6.
Seal the Paint:
After the final coat of chalk paint has dried, use a clear wax or sealant to protect the surface and prevent future chips or scratches. This step is crucial for maintaining the beauty of your chalk-painted cabinets. Apply the wax or sealant according to the manufacturer's instructions.Tips for Successful Chalk Paint Application
Here are some additional tips to help you achieve professional-looking results:
1.
Practice on a Scrap Piece:
Before directly applying the chalk paint to your cabinets, try a practice coat on a scrap piece of similar wood. This will help you familiarize yourself with the paint's consistency and ensure you have the right technique.2.
Use Light Pressure:
When applying the chalk paint, use light pressure to avoid brushstrokes showing through the paint.3.
Feather Edges:
Feather the edges of the paint strokes to create a smooth and seamless finish.4.
Allow Drying Time:
Ensure each layer of paint dries completely before applying the next.5.
Clean Tools Thoroughly:
Clean your brushes and rollers immediately after use to prevent paint from drying and hardening. Use soap and water or a paint thinner, depending on the type of paint used.Chalk paint offers a fantastic alternative to traditional paints for refreshing your oak kitchen cabinets. By following these steps and incorporating the provided tips, you can achieve a stunning transformation that creates a beautiful and personalized look.

Painting Kitchen Cabinets With Chalk Paint Simply Today Life

Chalk Painted Kitchen Cabinets 2 Years Later Our Storied Home

Chalk Painted Kitchen Cabinets 2 Years Later Our Storied Home

Why I Repainted My Chalk Painted Cabinets Sincerely Sara D Home Decor Diy Projects

Using Chalk Paint For Oak Kitchen Cabinets Test Door Distressed

Painting Kitchen Cabinets With Chalk Paint Simply Today Life

Why I Repainted My Chalk Painted Cabinets Sincerely Sara D Home Decor Diy Projects

Kitchen Cabinet Makeover With Chalk Paint Decorative By Annie Sloan

My Chalk Painted Cabinets 4 Years Later How Did They Do Artsy Rule

Chalk Painted Kitchen Cabinets 2 Years Later Our Storied Home
Related Posts

