Waxing Chalk Painted Kitchen Cabinets: A Comprehensive Guide
Transforming your kitchen cabinets with chalk paint can create a stunning and unique look. However, to ensure durability and protect your investment, waxing is an essential step in the finishing process. In this article, we will explore the key aspects of waxing chalk painted kitchen cabinets, providing you with a detailed guide to achieve professional-looking results.
Choosing the Right Wax
The choice of wax for your chalk painted cabinets depends on the desired finish and protection level. Paste waxes offer a deep, rich finish and can be buffed to a high sheen. Liquid waxes are easier to apply and spread evenly, and are ideal for larger surfaces or cabinets with intricate details. Clear waxes preserve the original hue of your paint, while tinted waxes can subtly alter or enhance the color.
Preparation and Cleaning
Before waxing, ensure that the chalk painted surface is completely clean and dry. Remove any debris or dust with a soft cloth or a brush. Use a damp cloth to wipe down the cabinets, removing any remaining dirt or chalk dust. Allow the cabinets to dry thoroughly before proceeding.
Waxing Process
Apply the wax using a clean cloth, sponge, or brush. Work in small sections at a time, applying a thin, even layer. Spread the wax in the direction of the wood grain, paying close attention to edges and details. Use a soft cloth or brush to buff the wax into the surface, creating a smooth and even finish. Avoid over-waxing, as it can lead to streaks or a cloudy appearance.
Drying and Curing
After applying the wax, allow it to dry and cure according to the manufacturer's instructions. This will typically take several hours to overnight. During this time, avoid touching the waxed surface to prevent fingerprints or smudges. Once the wax has cured, it is fully protective and resistant to wear and tear.
Maintaining Waxed Cabinets
Regular maintenance is crucial for preserving the beauty and longevity of your waxed cabinets. Wipe down the cabinets with a clean, damp cloth to remove dust or spills. For deeper cleaning, use a mixture of water and mild soap, and avoid abrasive cleaners that could damage the wax finish. If needed, reapply a thin layer of wax every few months to maintain its protective properties and enhance its appearance.

Step By Kitchen Cabinet Painting With Annie Sloan Chalk Paint Jeanne Oliver

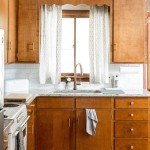
Chalk Painted Kitchen Cabinets 2 Years Later Our Storied Home

Chalk Painted Kitchen Cabinets 2 Years Later Our Storied Home

Step By Kitchen Cabinet Painting With Annie Sloan Chalk Paint Jeanne Oliver

Chalk Painted Kitchen Cabinets 2 Years Later Our Storied Home

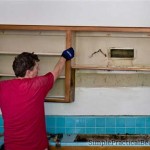
Why I Repainted My Chalk Painted Cabinets Sincerely Sara D Home Decor Diy Projects

Step By Kitchen Cabinet Painting With Annie Sloan Chalk Paint Jeanne Oliver

Painting Kitchen Cabinets With Chalk Paint Simply Today Life

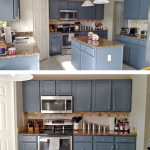
Chalk Paint And Dark Wax Updates A Bathroom Vanity Kitchen Cabinets Painting

Step By Kitchen Cabinet Painting With Annie Sloan Chalk Paint Jeanne Oliver
Related Posts