What Supplies Do I Need to Paint My Kitchen Cabinets?
Painting kitchen cabinets offers a cost-effective way to refresh a kitchen's aesthetic without the expense of a full remodel. However, achieving a professional-looking finish requires careful preparation and the right selection of tools and materials. This article provides a comprehensive list of the supplies necessary to paint kitchen cabinets effectively, ensuring a durable and visually appealing result.
Essential Cleaning and Surface Preparation Supplies
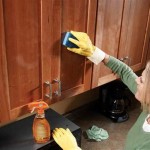
Proper surface preparation is paramount to the success of any paint job, especially on kitchen cabinets where grease, grime, and existing finishes can hinder adhesion. Thorough cleaning and surface preparation will promote better paint adhesion and a smoother final appearance. Failing to clean and prepare the surfaces adequately can lead to peeling, chipping, and an uneven finish.
Degreaser:
A strong degreaser is essential for removing grease and grime that accumulate on kitchen cabinets. Options include trisodium phosphate (TSP) or TSP substitutes. Ensure the chosen cleaner is compatible with the cabinet's material and the paint being used. Before applying any cleaner, it is crucial to test it in an inconspicuous area to check for any adverse reactions.Cleaning Sponges and Rags:
Use non-abrasive sponges and lint-free rags for cleaning. Microfiber cloths are particularly effective at trapping dirt and dust without leaving residue. Avoid using abrasive scrub pads, as they can scratch the cabinet surfaces.Scrub Brush:
A scrub brush, preferably with nylon bristles, can be helpful for tackling stubborn grease and grime, especially around handles and hinges. Ensure the brush is gentle enough not to damage the cabinet's finish.Painter’s Tape:
High-quality painter’s tape is essential for protecting countertops, walls, and other surfaces from paint splatters. Choose a tape specifically designed for delicate surfaces if working with pre-finished or easily damaged cabinets. Apply the tape carefully, ensuring it adheres firmly to create a clean, crisp line.Drop Cloths:
Protect flooring and surrounding surfaces with drop cloths. Canvas drop cloths are durable and reusable, while plastic drop cloths offer a more economical option. Ensure the drop cloths are large enough to cover the entire work area, preventing paint from reaching unintended surfaces.Sandpaper:
Various grits of sandpaper are necessary for different stages of preparation. Coarse grit sandpaper (80-120 grit) is used for removing existing finishes and addressing imperfections. Medium grit sandpaper (150-180 grit) is used for smoothing the surface after coarse sanding. Fine grit sandpaper (220 grit or higher) is used for creating an ultra-smooth surface before priming or painting. Use a sanding block or orbital sander for larger, flat surfaces to ensure even sanding. Always wear a dust mask when sanding to avoid inhaling harmful particles.Wood Filler (Optional):
If cabinets have dents, scratches, or imperfections, wood filler can be used to repair them. Choose a wood filler that is compatible with the cabinet material and the paint being used. Apply the filler according to the manufacturer's instructions, allowing it to dry completely before sanding smooth.Tack Cloths:
Tack cloths are used to remove dust and debris from the cabinets after sanding. These cloths are treated with a slightly sticky substance that effectively traps dust particles, ensuring a clean surface for priming and painting. Use a tack cloth immediately before applying primer or paint.Priming and Painting Supplies
Selecting the appropriate primer and paint is crucial for achieving a durable and aesthetically pleasing finish on kitchen cabinets. Primer creates a uniform surface for the paint to adhere to, while the paint provides the desired color and protection. Consider the material of the cabinets and the desired finish when choosing these products.
Primer:
Primer is essential for creating a smooth, uniform surface that promotes paint adhesion. Choose a primer specifically designed for cabinets, such as an oil-based or water-based bonding primer. Oil-based primers offer excellent adhesion and stain blocking, while water-based primers are low in VOCs and easy to clean up. Consider using a tinted primer that matches the color of the paint for better coverage. Apply the primer evenly, following the manufacturer's instructions.Paint:
Select a high-quality paint specifically formulated for cabinets and trim. Acrylic latex or alkyd paints are popular choices for their durability and ease of application. Choose a paint with a satin or semi-gloss finish for easy cleaning and a subtle sheen. Consider consulting with a paint professional to determine the best type of paint for the specific cabinet material and desired finish. Always stir the paint thoroughly before application.Paint Brushes:
High-quality paint brushes are essential for achieving a smooth, even finish. Choose brushes with synthetic bristles for use with latex paints and natural bristles for use with oil-based paints. Angled brushes are ideal for painting corners and edges. Invest in brushes of varying sizes to accommodate different areas of the cabinets. Clean the brushes thoroughly after each use to prolong their lifespan.Paint Rollers and Roller Frames:
Paint rollers are useful for applying paint to large, flat surfaces quickly and efficiently. Choose rollers with a nap length appropriate for the paint and the surface texture. Foam rollers are ideal for achieving a smooth, flawless finish, while microfiber rollers offer excellent paint pickup and release. Use a sturdy roller frame with a comfortable handle for extended painting sessions. Clean the rollers thoroughly after each use to prevent the paint from drying and hardening.Paint Trays:
Paint trays are essential for holding paint while using rollers or brushes. Choose a paint tray with a disposable liner for easy cleanup. Pour a small amount of paint into the tray and use the textured surface to remove excess paint from the roller or brush.Spray Gun (Optional):
A paint sprayer can provide a professional, factory-like finish on kitchen cabinets. Airless sprayers are commonly used for cabinet painting, as they provide excellent coverage and a smooth finish. Ensure the sprayer is properly calibrated and that the paint is thinned according to the manufacturer's instructions. Practice using the sprayer on a scrap piece of wood before painting the cabinets to get a feel for the spray pattern and paint flow. Always wear a respirator mask when using a paint sprayer to avoid inhaling harmful fumes.Paint Thinner (If Using Oil-Based Paint):
If using oil-based paint, paint thinner is necessary for thinning the paint and cleaning brushes and equipment. Choose a paint thinner specifically designed for oil-based paints. Follow the manufacturer's instructions for thinning the paint. Dispose of used paint thinner according to local regulations.Tools and Hardware Supplies
In addition to cleaning, priming, and painting supplies, several tools and hardware components are necessary for efficiently completing the cabinet painting project. These tools will aid in disassembly, reassembly, and achieving a professional-looking result.
Screwdriver or Drill:
A screwdriver or drill with various bits is necessary for removing and reinstalling cabinet doors, drawers, and hardware. Use a power drill with adjustable torque settings to prevent stripping screws. Keep track of the screws and hardware as they are removed to ensure they are reinstalled properly. Consider labeling the cabinets and hardware to make reassembly easier.Putty Knife:
A putty knife is used for applying wood filler and scraping away excess paint or imperfections. Choose a putty knife with a flexible blade for smooth application. Clean the putty knife thoroughly after each use to prevent the filler or paint from drying and hardening.Sandpaper Block:
A sanding block provides a flat, even surface for sanding cabinets. Use a sanding block to ensure consistent sanding pressure and prevent uneven sanding. Wrap the sandpaper around the block and secure it in place. Replace the sandpaper as it becomes worn.Respirator or Dust Mask:
Wear a respirator or dust mask at all times when sanding or spraying paint to protect against inhaling harmful particles and fumes. Choose a respirator with a NIOSH rating of N95 or higher for adequate protection. Ensure the mask fits properly and creates a tight seal around the face.Safety Glasses:
Wear safety glasses to protect eyes from dust, paint splatters, and other debris. Choose safety glasses with side shields for added protection. Ensure the glasses fit comfortably and do not obstruct vision.Work Gloves:
Wear work gloves to protect hands from paint, chemicals, and rough surfaces. Choose gloves made of latex, nitrile, or rubber for chemical resistance. Ensure the gloves fit properly and allow for dexterity.New Cabinet Hardware (Optional):
Replacing existing cabinet hardware with new knobs, pulls, and hinges can enhance the overall look of the painted cabinets. Choose hardware that complements the style and color of the cabinets. Consider the size and spacing of the existing hardware when selecting new hardware. Purchase high-quality hardware that is durable and easy to install.Cabinet Door Bumpers:
Cabinet door bumpers are small adhesive pads that are applied to the inside of cabinet doors to prevent them from slamming and causing damage. Choose bumpers that are clear or match the color of the cabinets. Apply the bumpers to the corners of the doors or the areas where the doors come into contact with the cabinet frame.By gathering all the necessary supplies and following these guidelines, individuals can approach the task of painting kitchen cabinets with confidence, achieving a professional and durable result that significantly enhances the kitchen's appearance.

The Complete List Of Supplies Needed To Paint Cabinets

The Average Diy Girl S Guide To Painting Cabinets

The Complete List Of Supplies Needed To Paint Cabinets

Tools For Painting Kitchen Cabinets Chaotically Creative

How To Paint Your Kitchen Cabinets Little House Big City

How To Paint Kitchen Cabinets In 7 Simple Steps

How To Prep And Paint Kitchen Cabinets Lowe S

How To Paint Kitchen Cabinets In 7 Simple Steps

Paint Your Cabinets With The Right Brush Diy Painting Cabinet Doors N More

How To Paint Oak Cabinets And Hide The Grain Tutorial
Related Posts