What Tools Do You Need to Install Kitchen Cabinets?
Installing kitchen cabinets represents a significant undertaking, demanding precision and the proper tools for a successful outcome. Attempting the project without the necessary equipment can lead to frustration, wasted time, and potentially damaged materials. This article will outline the comprehensive list of tools required to install kitchen cabinets effectively, categorized for ease of understanding.
Before commencing any cabinet installation, careful planning and preparation are crucial. This includes verifying measurements, ensuring adequate workspace, and confirming that all necessary materials and tools are readily available. A properly prepared workspace minimizes disruptions and maximizes efficiency throughout the installation process.
Essential Measuring and Layout Tools
Accurate measurements form the foundation of a successful cabinet installation. Precise measurements guarantee that cabinets fit correctly within the designated space and align properly. The following tools are indispensable for achieving accurate measurements and layouts:
Measuring Tape: A high-quality measuring tape, preferably one that extends at least 25 feet, is essential. Select a tape measure with clear markings and a sturdy casing to withstand regular use on the job site. A wide blade tape measure helps reduce flex and improves accurate measurements especially when reaching longer distances across rooms.
Laser Level: A laser level projects a perfectly horizontal or vertical line along the walls, serving as a guide for installing cabinets at the correct height and ensuring they are plumb. Laser levels are particularly beneficial for larger kitchen installations or when dealing with uneven floors or walls. Self-leveling laser levels automatically compensate for minor imperfections in the surface, enhancing accuracy and ease of use.
Spirit Level: A spirit level, also known as a bubble level, is crucial for confirming that cabinets are both level and plumb. Use a variety of lengths, typically a 4-foot level for longer runs and a smaller level (around 1-2 feet) for shorter sections. A torpedo level, a smaller, more compact spirit level, is particularly useful for tight spaces.
Stud Finder: Kitchen cabinets are heavy and require secure attachment to wall studs. A stud finder accurately locates the studs behind the drywall, allowing for solid anchor points. Electronic stud finders are generally more accurate and reliable than magnetic stud finders. Invest in a stud finder that detects both edges of the stud for precise screw or nail placement.
Combination Square: The combination square is a versatile tool used for marking right angles, measuring depths, and scribing lines. It's particularly useful for ensuring cabinet faces are square and for transferring measurements accurately. The adjustable head allows for accurate marking of angles for a variety of installation requirements.
Pencil and Marking Tools: Several pencils, including both standard wood pencils and mechanical pencils with fine leads, are necessary for marking measurements and reference lines on walls and cabinets. A permanent marker may also be helpful for marking stud locations or other permanent reference points that need to be visible. Be sure to have a pencil sharpener on hand.
Power Tools for Efficient Installation
Power tools significantly expedite the cabinet installation process and provide the power and precision necessary for securely fastening cabinets. The following power tools are considered essential:
Drill/Driver: A cordless drill/driver is the workhorse of cabinet installation. It is employed for drilling pilot holes, driving screws to secure cabinets to the wall studs, and installing hardware. Select a drill/driver with variable speed settings for better control and a powerful motor to handle demanding tasks. Several batteries will allow for uninterrupted work.
Impact Driver: While a drill/driver can handle many screw-driving tasks, an impact driver provides significantly more torque, making it ideal for driving long screws into dense materials like studs. Use an impact driver for fastening cabinets to walls and installing drawer hardware that requires substantial torque.
Circular Saw: A circular saw is necessary for cutting filler pieces, scribing panels, and making other adjustments to cabinets. Select a saw with a sharp blade designed for cutting plywood and laminate, as these materials are commonly used in cabinet construction. A track saw improves the accuracy and cleanliness of cuts. Safety glasses and hearing protection are a must.
Jigsaw: A jigsaw is useful for making curved or intricate cuts, such as cutting around pipes or electrical outlets. A jigsaw is more portable and versatile than a circular saw for smaller cuts around obstructions. Use a fine-tooth blade for clean cuts and control the cutting speed to prevent splintering.
Multi-Tool (Oscillating Tool): A multi-tool is a versatile tool that can be used for a variety of tasks, including cutting shims flush, trimming cabinet edges, and making precise cuts in tight spaces. The oscillating action allows access to cuts that would be difficult or impossible with other tools. A variety of blades will handle most installation situations.
Router (Optional): A router, especially with a laminate trimming bit, can be useful for trimming laminate edges, creating decorative profiles, and making precise inlays. Although typically not essential, a router can be invaluable for achieving a professional finish, particularly on custom cabinet projects.
Hand Tools for Fine-Tuning and Finishing
While power tools handle the bulk of the work, hand tools are essential for fine-tuning and finishing the installation, ensuring a clean and professional appearance. The following hand tools are typically required:
Clamps: Various types of clamps, including bar clamps, pipe clamps, and quick-grip clamps, are necessary for holding cabinets together during assembly, gluing face frames, and securing cabinets to walls while the adhesive sets. Clamps ensure tight joints and prevent movement during the installation process. A variety of sizes will handle differing materials and situations.
Hammer: A standard claw hammer is useful for driving nails, tapping cabinets into place, and making minor adjustments. A rubber mallet is also useful for tapping cabinets without damaging the finish. Select a hammer with a comfortable grip and a balanced weight for extended use.
Screwdrivers: Both Phillips head and flathead screwdrivers are essential for installing hardware, adjusting hinges, and making other minor adjustments. A variety of sizes will handle different screw types and sizes. Consider purchasing a multi-bit screwdriver with interchangeable bits for convenience.
Utility Knife: A utility knife is used for scoring drywall, cutting shims, and trimming excess caulk or adhesive. Select a utility knife with a retractable blade and a comfortable grip for safety and ease of use. Keep a supply of sharp replacement blades on hand.
Caulk Gun: A caulk gun is used to apply caulk along cabinet seams, countertops, and backsplashes, creating a watertight seal and improving the overall appearance. Choose a caulk gun with a smooth trigger action and a rotating barrel for easy application. Select a caulk that matches the color of the cabinets or countertops.
Putty Knife/Scraper: A putty knife is useful for applying wood filler to nail holes or imperfections in the cabinet finish. A scraper is used for removing excess caulk or adhesive and for cleaning surfaces. A stainless steel putty knife is durable and easy to clean.
Shims: Shims, typically made of wood or plastic, are used to level cabinets and fill gaps between the cabinets and the wall. Shims are essential for achieving a perfectly level and plumb installation, especially when dealing with uneven floors or walls. A variety of thicknesses will assist in achieving perfectly aligned cabinets.
Nail Gun (Optional): A nail gun, either pneumatic or cordless, can be used to attach face frames, secure trim, and install other decorative elements. A brad nailer is typically used for cabinet installation, as it leaves small, easily concealed holes. If owning an air compressor, a pneumatic nail gun is an effective investment. Safety glasses are a must when operating a nail gun.
Safety Equipment: Protecting Yourself
Safety should always be the top priority during any construction project. The following safety equipment is essential for protecting oneself during cabinet installation:
Safety Glasses: Safety glasses protect the eyes from flying debris, dust, and other hazards. Always wear safety glasses when using power tools or working with materials that produce dust or particles. Choose safety glasses that fit comfortably and provide adequate coverage.
Hearing Protection: Power tools can generate significant noise levels, which can damage hearing over time. Wear earplugs or earmuffs to protect the ears from excessive noise. Choose hearing protection that is comfortable to wear and provides adequate noise reduction.
Dust Mask or Respirator: Cutting and sanding wood and other materials can create significant dust, which can be harmful to the lungs. Wear a dust mask or respirator to protect the respiratory system from dust and other airborne particles. A respirator provides a higher level of protection than a dust mask.
Gloves: Gloves protect the hands from cuts, scrapes, and splinters. Wear work gloves that provide a good grip and allow for dexterity. Choose gloves that are appropriate for the task at hand.
Knee Pads: Working on the floor for extended periods can be hard on the knees. Wear knee pads to provide cushioning and support. Select knee pads that are comfortable to wear and provide adequate protection.
Having the right tools is essential for a successful kitchen cabinet installation. This comprehensive list provides a foundation for preparing for this type of project and ensuring a professionally installed result. Investing in quality tools and safety equipment will not only improve the efficiency of the project but also enhance the overall quality and durability of the finished kitchen.

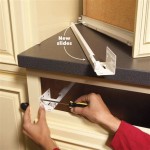
How To Install Upper Cabinets Like A Pro Cabinetselect Com

Cabinet Installation Kitchen Rta Cabinets Orange County Pre Made Whole Quartz Countertop Slab Prefab Granite

How To Install Cabinet Hardware With Young House Love

20 Essential Cabinet Installation Tools That Make The Job Easy Electronicshub

Must Have Tools For Cabinet Making And Furniture Building

Must Have Tools For Cabinet Making And Furniture Building

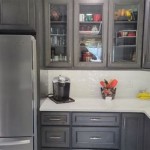
How To Install Kitchen Cabinets Diy Family Handyman

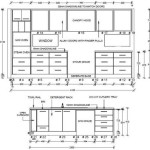
Might Not Be Easy To Get The Hang Of Installing Cabinets

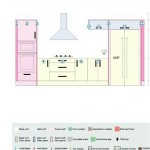
How To Install Kitchen Cabinets Detailed Guide By Fantastic Services Au

Must Have Tools For Cabinet Making And Furniture Building
Related Posts