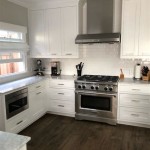
White Kitchen Cabinet Makeover: Breathing New Life into Your Space
White kitchen cabinets are a classic and enduring choice. They offer a clean, bright, and versatile foundation for any kitchen design, seamlessly fitting into various aesthetics from traditional to modern. However, even the most timeless elements can begin to show their age. Discoloration, wear and tear, and a desire for a fresh look can prompt a kitchen cabinet makeover. This article explores the multifaceted process of revitalizing white kitchen cabinets, offering information on preparation, painting techniques, hardware upgrades, and other methods to transform your kitchen space.
Preparation is Paramount
Before applying a single brushstroke, thorough preparation is critical for achieving a professional and lasting finish. This stage is arguably the most time-consuming, but skipping steps will invariably lead to unsatisfactory results. The preparation phase involves cleaning, disassembling, sanding, and priming the cabinets and drawers.
Cleaning: Years of accumulated grease, grime, and dust can hinder paint adhesion. Begin by removing all hardware, such as knobs, pulls, and hinges. These should be stored in labeled bags to ensure easy reinstallation. Use a degreasing cleaner specifically designed for kitchen surfaces to thoroughly scrub the cabinets, both inside and out. Pay particular attention to areas around the stove and sink, where grease and moisture tend to accumulate. Rinse thoroughly with clean water and allow the cabinets to dry completely. A tack cloth can also be used to remove any remaining dust particles.
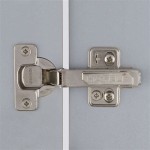
Disassembly: Removing doors and drawers from the cabinet frames is essential for proper paint application. This allows for easier access to all surfaces and prevents paint from dripping or pooling in corners. Label each door and drawer with a corresponding number or letter indicating its position in the kitchen. This simple step prevents confusion during reassembly. Hardware may also need disassembly depending on the cleaning and painting methods used.
Sanding: Sanding creates a slightly rough surface, which allows the primer and paint to adhere properly. Use a medium-grit sandpaper (around 120-grit) to lightly sand all surfaces of the cabinets and drawers. Focus on removing any existing gloss or imperfections. Avoid excessive sanding, as this can damage the cabinet material. For cabinets with intricate details or profiles, use a sanding sponge or flexible sanding pad to reach tight spaces. After sanding, wipe down the surfaces with a tack cloth to remove any sanding dust.
Priming: Primer acts as a bridge between the existing cabinet surface and the new paint. It promotes adhesion, seals the surface, and helps to prevent stains from bleeding through. Choose a high-quality primer specifically designed for kitchen cabinets. Oil-based primers offer excellent adhesion and stain blocking properties, but they require mineral spirits for cleanup and can have a strong odor. Water-based primers are lower in odor and easy to clean up, but may require multiple coats for optimal performance. Apply the primer evenly using a brush, roller, or sprayer. Allow the primer to dry completely according to the manufacturer's instructions, and then lightly sand with a fine-grit sandpaper (around 220-grit) to create a smooth base for the paint.
Painting Techniques for a Flawless Finish
The painting process is where the true transformation takes place. Selecting the right paint and applying it with proper technique are crucial for achieving a durable and aesthetically pleasing finish. The choice of paint, application method, and number of coats will all impact the final result.
Paint Selection: Selecting the right paint is paramount. Choose a paint that is durable, washable, and resistant to chipping and staining. Acrylic latex paints are a popular choice for kitchen cabinets because they are water-based, low in odor, and easy to clean. Alkyd paints, while oil-based, offer a harder, more durable finish, but they require mineral spirits for cleanup. Consider a paint with a satin or semi-gloss finish, as these are easier to clean than matte finishes. Consult with a paint professional to determine the best paint for your specific cabinet material and desired aesthetic. Tinted primers can be used to help achieve a full coverage of your final color coat.
Application Methods: Several methods can be used to apply paint to kitchen cabinets, each with its own advantages and disadvantages. Brushing is the most traditional method and is suitable for smaller projects or for achieving a textured finish. Use a high-quality brush designed for the type of paint you are using. Rollers provide a smoother finish than brushes and are ideal for larger surfaces. Use a foam roller or a microfiber roller for best results. Spraying provides the smoothest, most professional-looking finish, but it requires specialized equipment and a well-ventilated workspace. Consider using a sprayer, either airless or HVLP, for larger projects or for achieving a factory-like finish. When using a sprayer, be sure to mask off surrounding areas to protect them from overspray.
Number of Coats: Two to three coats of paint are typically required for optimal coverage and durability. Apply each coat evenly and allow it to dry completely according to the manufacturer's instructions. Lightly sand between coats with a fine-grit sandpaper (around 320-grit) to remove any imperfections and create a smooth surface for the next coat. Be sure to wipe down the surfaces with a tack cloth after each sanding.
Proper Drying: Allowing the paint to cure completely is essential for a durable finish. Follow the manufacturer's instructions regarding drying times. Avoid handling the cabinets excessively during the drying process. Consider using a drying rack to prevent the cabinets from sticking together. Once the paint is fully cured, you can begin to reassemble the cabinets and install the hardware.
Beyond Paint: Additional Makeover Strategies
While painting is a primary method for revitalizing white kitchen cabinets, other strategies can enhance the overall transformation. These include hardware upgrades, lighting adjustments, and stylistic alterations to doors and accessories related to the cabinetry.
Hardware Upgrades: Replacing old or outdated hardware can drastically change the look of your kitchen cabinets. Consider swapping out existing knobs and pulls for more modern or stylish options. Choose hardware that complements your overall kitchen design and color scheme. Brushed nickel, stainless steel, and matte black are popular choices for contemporary kitchens, while antique brass and oil-rubbed bronze are suitable for more traditional spaces. Experiment with different sizes and styles to find the perfect fit for your cabinets. Ensure that the new hardware aligns with the existing holes, or be prepared to drill new holes if necessary. This is a great opportunity to change the character of the kitchen without major construction.
Lighting Adjustments: Lighting plays a crucial role in highlighting the beauty of your refreshed kitchen cabinets. Consider adding under-cabinet lighting to illuminate countertops and workspaces. Install brighter overhead lighting to create a more welcoming and functional space. Choose light fixtures that complement your overall kitchen design and enhance the color of your cabinets. Warm lighting can create a cozy and inviting atmosphere, while cool lighting can provide a more modern and energetic feel. A dimmer switch can also be added to control the intensity of the lighting and create different moods.
Door and Accessory Styles: Shaker style doors are a popular choice for their clean lines and versatility. Flat-panel doors offer a more modern and minimalist aesthetic. Raised-panel doors provide a more traditional and ornate look. Additionally accessories can be updated such as adding pull-out shelving or spice racks to improve functionality. Crown molding can also add visual interest to the top of the cabinets. Glass-front doors can be used to display decorative items or to create a sense of openness. These stylistic changes can significantly alter the look of the kitchen, making it feel more modern, traditional, or personalized.
Revitalizing white kitchen cabinets offers a cost-effective way to breathe new life into a kitchen without a complete renovation. By investing time and effort in thorough preparation, selecting the right materials, and employing proper techniques, homeowners can achieve a professional-looking finish that enhances the beauty and functionality of their kitchen space. Thoughtful consideration of hardware updates, lighting adjustments, and door style alterations can further elevate the transformation, creating a kitchen that reflects personal style and design preferences.

Painted Kitchen Cabinet Makeover Tips Perfecting Places

Bright White Kitchen Makeover On A Budget

E Design An Oak Cabinet Makeover With White Dove Kitchen Diy Remodel Small

The Moment You Ve Been Waiting For Our White Kitchen Makeover Reveal Decor

Beautiful Kitchen Makeover Photos With White Cabinets And Quartz Countertop Abbotts At Home

How To Paint Your Kitchen Cabinets White Roots Wings Furniture Llc

Cool Calming Kitchen Makeover The Perfect Finish Blog By Kilz

37 Best Farmhouse Kitchen Cabinets Makeover Ideas Cabinet Design Rustic Modern

Our Dark To White Kitchen Remodel Before And After Setting For Four Interiors

21 Kitchen Cabinet Ideas Paint Colours Inspiration Benjamin Moore
Related Posts