Whitewash Stain Kitchen Cabinets: A Comprehensive Guide
Whitewash stain kitchen cabinets offer a versatile aesthetic, bridging the gap between traditional and contemporary styles. This finish, known for its ability to brighten and modernize a space while retaining a hint of the wood's natural character, has gained considerable popularity among homeowners and interior designers. Understanding the properties of whitewash stain, the application process, and the long-term maintenance involved is crucial for achieving desired results and ensuring the longevity of the finished cabinetry.
The term "whitewash" refers to a diluted paint or stain, typically white, applied to a wood surface. This technique allows some of the wood grain and texture to remain visible, creating a subtle, textured effect. Unlike opaque paint, which completely covers the wood, whitewash enhances the existing beauty of the material. The resulting finish offers a soft, muted look that can complement a wide range of kitchen designs, from farmhouse and rustic to minimalist and modern.
The specific tone and texture of whitewashed cabinets can vary significantly depending on several factors, including the type of wood used, the application technique, and the type of whitewash product employed. Softwoods like pine and fir tend to absorb more stain, resulting in a more pronounced whitewashed effect. Hardwoods like oak and maple, on the other hand, generally exhibit a more subtle, translucent finish. This variability is part of the charm of whitewashed cabinets, as each installation will have its own unique characteristics.
Choosing the Right Whitewash Product
Selecting the appropriate whitewash product is a critical first step in achieving the desired finish. Several options are available, each with its own advantages and disadvantages. These include traditional whitewash, tinted whitewash, and commercially available whitewash stains. Traditional whitewash is typically made from lime and water, offering an environmentally friendly and historically accurate finish. However, it may not be as durable or water-resistant as other options, making it less suitable for high-use kitchen cabinets.
Tinted whitewash involves adding small amounts of pigment to the whitewash mixture to create a subtle color wash. This allows for customization and can be used to complement other elements in the kitchen design. For instance, a slightly gray-toned whitewash can be used to create a more contemporary look, while a warm, beige-toned whitewash can enhance the rustic appeal of the cabinets.
Commercially available whitewash stains are specifically formulated for wood surfaces and offer improved durability and water resistance compared to traditional whitewash. These products often contain binders and sealers that help protect the wood from moisture and stains. They are also typically easier to apply and maintain, making them a popular choice for DIY projects and professional installations alike. When selecting a commercial whitewash stain, it is important to choose a product specifically designed for interior use and to follow the manufacturer's instructions carefully.
Furthermore, the sheen of the whitewash finish should also be considered. Matte finishes tend to be more forgiving and create a softer, more natural look, while glossy finishes can add a touch of formality and are easier to clean. However, glossy finishes also tend to highlight imperfections in the wood surface, so careful preparation is essential.
Preparing the Cabinets for Whitewash Stain
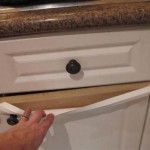
Proper preparation is paramount to achieving a successful whitewash finish. This process involves cleaning, sanding, and priming the cabinets to ensure optimal adhesion and a smooth, even surface. Failing to adequately prepare the cabinets can result in an uneven finish, poor adhesion, and premature wear and tear.
The first step is to thoroughly clean the cabinets to remove any dirt, grease, or existing finishes. A mild detergent and water solution can be used for this purpose, followed by a thorough rinsing with clean water. Stubborn stains or grease may require a stronger cleaner, such as TSP (trisodium phosphate), but it is crucial to follow the manufacturer's instructions and wear appropriate protective gear when handling such chemicals.
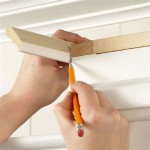
Once the cabinets are clean, they should be sanded to create a smooth, even surface and to provide a better "key" for the whitewash stain. The grit of sandpaper used will depend on the condition of the cabinets. For cabinets with existing finishes, a coarser grit sandpaper (e.g., 120-grit) may be needed to remove the old finish. For cabinets that are already smooth, a finer grit sandpaper (e.g., 220-grit) can be used to lightly scuff the surface. It is important to sand with the grain of the wood to avoid creating scratches.
After sanding, the cabinets should be thoroughly dusted to remove any sanding residue. A tack cloth is particularly effective for this purpose, as it will pick up even the finest particles of dust. Once the cabinets are clean and smooth, they are ready for priming. Priming is an essential step, as it helps to seal the wood, prevent the stain from being absorbed unevenly, and improve the adhesion of the whitewash finish.
A high-quality primer specifically designed for wood should be used. Oil-based primers are generally more effective at sealing the wood and preventing tannin bleed-through, but they require longer drying times and can be more difficult to clean up. Water-based primers are easier to use and clean up, but they may not be as effective at sealing the wood. Regardless of the type of primer used, it should be applied in thin, even coats, following the manufacturer's instructions. Once the primer is dry, the cabinets can be lightly sanded again with a fine-grit sandpaper to remove any imperfections and create an even smoother surface.
Applying the Whitewash Stain
The application of the whitewash stain is a crucial step that determines the final appearance of the cabinets. Several techniques can be used to apply the stain, including brushing, wiping, and spraying. Each technique has its own advantages and disadvantages, and the best choice will depend on the desired look and the skill level of the applicator.
Brushing is a traditional method of applying whitewash stain, and it can be used to create a textured, rustic look. When brushing, it is important to use a high-quality brush designed for staining. The stain should be applied in thin, even coats, following the grain of the wood. Excess stain should be wiped away with a clean cloth to prevent drips and runs. This method allows for greater control over the application and can be used to emphasize the wood grain.
Wiping is another popular technique for applying whitewash stain. This involves applying the stain to the surface and then immediately wiping it away with a clean cloth. This method creates a more subtle, translucent finish, as it allows more of the wood grain to show through. Wiping is particularly effective for hardwoods like oak and maple, which tend to be less absorbent than softwoods.
Spraying is a faster and more efficient method of applying whitewash stain, particularly for large surfaces. However, it requires specialized equipment, such as a paint sprayer, and a higher level of skill to achieve a uniform finish. When spraying, it is important to follow the manufacturer's instructions carefully and to wear appropriate protective gear, such as a respirator and eye protection. This method can produce a very even, thin coat, but might require additional steps to achieve the desired texture or depth of color.
Regardless of the application technique used, it is important to allow the stain to dry completely before applying a topcoat. The drying time will vary depending on the product used and the environmental conditions. Applying a topcoat before the stain is fully dry can result in adhesion problems and an uneven finish. Multiple thin coats of stain are preferable to a single thick coat, allowing for better control over the final color intensity. Before applying a topcoat, lightly sand the stained surface with fine-grit sandpaper to ensure proper adhesion and a smooth feel.
Protecting the whitewashed finish with a topcoat is essential for durability and ease of maintenance. Topcoats made of polyurethane or other durable materials will help prevent wear and tear from daily use. Once the cabinets are sealed, they should be cleaned regularly with a mild detergent and water solution to remove any dirt or grime. Avoid using abrasive cleaners or harsh chemicals, as these can damage the finish. With proper care and maintenance, whitewash stain kitchen cabinets can provide years of beauty and functionality.

25 Best Collection Whitewash Oak Cabinets Home Decor And Garden Ideas Stained Kitchen Wooden

Whitewashed Cabinet Makeover Confessions Of A Serial Do It Yourselfer

Whitewashed Kitchen Cabinets Finishes Ashley Spencer

White Washed Kitchen Cabinets French Phoebe Howard

The Best White Wood Stain Options

Whitewashed Cabinet Makeover Confessions Of A Serial Do It Yourselfer

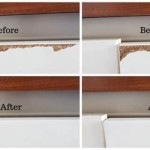
Whitewashed Kitchen Cabinets Before And After Finishes Close Up Finishe Whitewash Cherry

Whitewashed Kitchen Cabinets Finishes Ashley Spencer

How To Make A Pickled Or White Wash Finish Ron Hazelton

55 White Washed Ish Ideas Kitchen Remodel Design Oak Cabinets
Related Posts