Adding Shelves Below Kitchen Cabinets: Maximizing Space and Enhancing Organization
Kitchens, often the hub of a home, are frequently plagued by the universal challenge of limited space. Countertops become cluttered, cabinets overflow, and finding essential items can transform into a frustrating ordeal. One increasingly popular solution to combatting this spatial constraint is the addition of shelves below existing kitchen cabinets. This approach offers a pragmatic and aesthetically pleasing way to expand storage capacity while maintaining a clean and organized kitchen environment.
The concept of adding shelves below kitchen cabinets involves installing open shelving units that attach to the underside of the existing cabinets. This area, often underutilized, can be transformed into a functional space for storing frequently used items, decorative pieces, or even cookbooks. By extending the vertical storage capacity, homeowners can free up valuable countertop space and streamline their kitchen workflow.
Several factors contribute to the growing interest in this storage solution. The ease of access provided by open shelving is a major draw, allowing for quick retrieval of items without needing to open cabinet doors or rummage through cluttered shelves. Furthermore, the visual appeal of well-organized open shelving can enhance the overall aesthetic of the kitchen, creating a more inviting and personalized space. The relatively straightforward installation process, often achievable as a DIY project, also makes it an attractive option for homeowners seeking to improve their kitchen functionality without extensive renovations.
Understanding the Benefits of Under-Cabinet Shelving
The advantages of adding shelves below kitchen cabinets extend beyond simply providing additional storage space. These shelves offer a multifaceted approach to improving kitchen organization, enhancing accessibility, and contributing to the overall aesthetic appeal of the room. By carefully considering the specific needs of the kitchen and selecting the appropriate shelving style and materials, homeowners can maximize the benefits of this innovative storage solution.
Firstly, under-cabinet shelving significantly improves space utilization. The area beneath kitchen cabinets is frequently left unused, representing a significant waste of potential storage. By installing shelves in this space, homeowners can effectively expand their storage capacity without altering the existing layout of the kitchen. This is particularly beneficial in smaller kitchens where space is at a premium. The shelves can accommodate various items, from everyday essentials like mugs and spices to decorative pieces that add personality to the kitchen.
Secondly, accessibility is a key benefit of under-cabinet shelving. Unlike items stored inside cabinets, which require opening doors and potentially navigating through layers of clutter, items displayed on open shelves are readily accessible. This is particularly useful for frequently used items such as coffee mugs, cooking utensils, or spice jars. Having these items within easy reach streamlines the cooking process and minimizes the time spent searching for essentials. The visual access also allows for a quick assessment of available supplies, reducing the likelihood of running out of critical ingredients or tools.
Thirdly, under-cabinet shelving can enhance the aesthetic appeal of the kitchen. When styled thoughtfully, open shelves can serve as a decorative element, adding visual interest and personality to the space. Displaying aesthetically pleasing items, such as colorful dishware, vintage cookbooks, or potted herbs, can transform the kitchen into a more inviting and visually appealing environment. The open nature of the shelving also allows for the incorporation of lighting fixtures, further enhancing the ambiance of the kitchen and highlighting the displayed items.
Planning and Preparation for Installation
Before embarking on the installation process, careful planning and preparation are crucial to ensuring a successful outcome. This involves assessing the existing kitchen layout, selecting the appropriate shelving materials and style, and gathering the necessary tools and equipment. A well-thought-out plan will not only minimize potential challenges during the installation process but also ensure that the finished product meets the specific needs and aesthetic preferences of the homeowner.
The initial step involves assessing the available space beneath the cabinets. Measure the height, width, and depth of the area to determine the optimal size and configuration of the shelves. Consider the types of items that will be stored on the shelves and ensure that the chosen dimensions can accommodate them comfortably. It is also essential to consider any existing obstructions, such as electrical outlets or plumbing fixtures, that may impact the placement of the shelves.
Next, select the appropriate shelving materials and style. Various materials are available, including wood, metal, and glass, each offering distinct aesthetic and functional properties. Wood shelves provide a classic and versatile look, while metal shelves offer a more modern and industrial aesthetic. Glass shelves can create a sense of lightness and openness, particularly useful in smaller kitchens. The style of the shelves should complement the existing kitchen décor and reflect the homeowner's personal preferences. Consider factors such as the finish, edge profile, and hardware when making the selection.
Finally, gather the necessary tools and equipment. This typically includes a drill, level, measuring tape, pencil, stud finder, screws, and shelving brackets. The specific tools required may vary depending on the chosen shelving materials and installation method. Ensure that all tools are in good working order and that the homeowner is familiar with their proper usage. Safety glasses and gloves are recommended to protect against potential hazards during the installation process.
Step-by-Step Guide to Installing Under-Cabinet Shelving
The installation process for under-cabinet shelving generally involves several key steps, from marking the shelf placement to securing the shelves to the underside of the cabinets. While the specific details may vary depending on the chosen shelving system, these general steps provide a comprehensive guide to successfully completing the project. Accuracy and attention to detail are paramount throughout the installation process to ensure a sturdy and visually appealing result.
The first step is marking the shelf placement. Use a stud finder to locate the studs in the wall behind the cabinets. This will provide a secure anchor point for the shelving brackets. Use a level and measuring tape to mark the desired height and position of the shelves on the underside of the cabinets. It is crucial to ensure that the shelves are level and evenly spaced to maintain a balanced and aesthetically pleasing appearance. Use a pencil to mark the location of the screw holes for the shelving brackets.
Next, pre-drill pilot holes for the screws. This will help to prevent the wood from splitting and make it easier to drive the screws straight and securely. Use a drill bit that is slightly smaller than the diameter of the screws. Carefully align the drill bit with the marked screw hole locations and drill the pilot holes to a depth of approximately half the length of the screws.
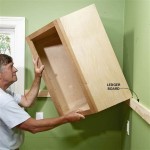
Now, attach the shelving brackets to the underside of the cabinets. Align the brackets with the pre-drilled pilot holes and secure them in place using screws. Ensure that the brackets are firmly attached to the cabinets and that they are level and evenly spaced. If using adjustable shelving brackets, ensure that they are properly adjusted to the desired height before securing them in place.
Finally, place the shelves onto the brackets. Carefully align the shelves with the brackets and ensure that they are properly seated. If using shelves that attach to the brackets with screws or clips, secure them in place according to the manufacturer's instructions. Once the shelves are in place, double-check that they are level and stable before placing any items on them.
After the installation is complete, it is advisable to inspect the shelves thoroughly to ensure that they are securely attached and capable of supporting the intended weight. Make any necessary adjustments or modifications to ensure the stability and safety of the shelving system. Clean the shelves thoroughly before placing any items on them.
Adding shelves below kitchen cabinets is a practical and aesthetically pleasing solution for maximizing space and enhancing organization in the kitchen. By carefully planning the installation, selecting the appropriate materials and style, and following a step-by-step guide, homeowners can transform underutilized space into a functional and visually appealing storage area. The benefits of under-cabinet shelving extend beyond simply providing additional storage; it enhances accessibility, streamlines workflow, and contributes to the overall aesthetic appeal of the kitchen.

Shelf Under Cabinets Sawdust 2 Stitches

10 Simple Ideas To Update Your Kitchen Cabinets Jenna Sue Design

Genius Diy Raising Kitchen Cabinets And Adding An Open Shelf The Crazy Craft Lady

How To Raise Your Kitchen Cabinets The Ceiling Wildfire Interiors

How To Raise Your Kitchen Cabinets The Ceiling Wildfire Interiors

Moving Cabinets Adding Shelves And Maximizing Space Kitchen Cabinet Improvements Cupboard Redo Cupboards

20 Kitchen Storage Ideas Extra Space

Pin On Kitchen

Maximize Kitchen Storage With Under Cabinet Shelves

Closed Cabinets V Open Shelving Revisited Centsational Style
Related Posts

