Here is an article on how to install kitchen cabinets into plaster walls:
How To Install Kitchen Cabinets Into Plaster Walls
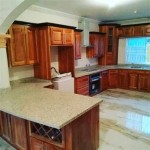
Installing kitchen cabinets is a significant home improvement project that can dramatically enhance the functionality and aesthetic appeal of a kitchen. When dealing with plaster walls, a common feature in older homes, the process requires careful planning and execution to ensure the cabinets are securely and safely mounted. Plaster, unlike drywall, is a harder, more brittle material that can be prone to cracking and crumbling if not handled correctly. This article aims to provide a comprehensive guide on how to successfully install kitchen cabinets into plaster walls, covering everything from preparation and finding studs to mounting techniques and addressing potential challenges.
Before embarking on the installation, it is imperative to thoroughly assess the existing plaster walls. This assessment involves checking for any existing damage, such as cracks, holes, or loose sections. Repairing any pre-existing damage is crucial before attempting to install cabinets. Failure to do so can exacerbate the problem and compromise the stability of the cabinet installation. Small cracks can often be filled with patching plaster, while larger areas may require more extensive repairs, possibly involving the application of a bonding agent and multiple layers of plaster.
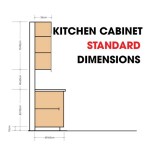
Accurate measurements are paramount to a successful cabinet installation. Begin by determining the desired height of the base cabinets and marking a level line along the wall. This line will serve as a reference for the top of the base cabinets. Next, measure and mark the locations of the wall cabinets, ensuring they align with the planned layout and account for any appliances or features that may affect their placement. Using a laser level or a long spirit level is recommended to maintain a consistent and accurate line across the wall.
Identifying and Locating Wall Studs
The most critical aspect of installing cabinets into plaster walls is securely attaching them to the wall studs. Wall studs provide the necessary structural support to bear the weight of the cabinets and their contents. Plaster walls present a unique challenge because the depth of the plaster and lath (the wooden strips that support the plaster) can obscure the location of the studs. Relying solely on a standard stud finder might not be reliable, as the density and thickness of the plaster can interfere with its accuracy.
A combination of techniques is often required to accurately locate the studs. Begin by using a stud finder to get a general idea of their locations. Then, use a small nail or awl to probe the wall at suspected stud locations. If the nail encounters resistance, it is likely hitting a stud. If it passes through easily, it is hitting the space between studs. Mark each stud location clearly on the wall with a pencil. It is crucial to verify the stud locations using multiple methods to ensure accuracy. This process may involve checking for outlets or switches, which are typically attached to the sides of studs, offering a visual clue to stud placement.
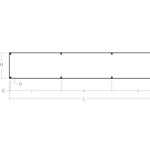
Once the stud locations are identified, use a level to draw vertical lines extending from the floor to the ceiling, marking the center of each stud. These lines will serve as guides for attaching the cabinets. It is important to double-check all measurements and stud locations before proceeding with the installation. Any errors at this stage can lead to alignment issues and compromised cabinet stability.
Preparing the Wall and Cabinets
Before installing the cabinets, it is advisable to prepare the wall and the cabinets themselves. For the wall, consider applying a backing board. A backing board, typically made of plywood, is attached to the studs behind the cabinets. This adds extra support and provides a consistent surface for securing the cabinets. The backing board should be slightly wider than the cabinets and extend from the floor to the ceiling. When attaching the backing board, use long screws that penetrate deep into the studs. This will ensure the backing board is securely fastened to the wall.
For the cabinets, pre-drill pilot holes through the cabinet frame at the locations where they will be screwed to the studs and/or backing board. This will prevent the wood from splitting when the screws are tightened. Check the manufacturer's instructions for the recommended screw size and length. Ensure the screws are long enough to penetrate the stud or backing board sufficiently for a secure hold. It is also helpful to apply construction adhesive to the back of the cabinet frame where it will contact the wall or backing board. This will provide an additional bond and help to prevent the cabinets from shifting over time.
When dealing with plaster walls, consider using specialized screws designed for plaster. These screws typically have a coarse thread that grips the plaster and lath effectively. They are also less likely to cause the plaster to crumble or crack. Another option is to use toggle bolts or molly bolts, which provide a strong anchor in hollow walls. However, these anchors are best suited for lighter cabinets or situations where access to a stud is not possible.
Mounting the Cabinets
The actual mounting process requires careful attention to detail and a methodical approach. Start with the upper cabinets, as they are typically hung first. Use a temporary support system, such as a ledger board, to hold the cabinets in place while they are being secured. The ledger board should be attached to the wall at the desired height of the bottom of the upper cabinets. This will allow you to work hands-free and ensure the cabinets are level.
Lift the first upper cabinet into place and rest it on the ledger board. Align the cabinet with the marked stud lines and pre-drilled pilot holes. Use a level to ensure the cabinet is perfectly level both horizontally and vertically. Once the cabinet is aligned, drive the screws through the pilot holes and into the studs. Start with the top screws to secure the cabinet in place and then move to the bottom screws. Avoid over-tightening the screws, as this can strip the threads or damage the cabinet frame.
After the first cabinet is securely mounted, proceed with the remaining upper cabinets. Ensure that each cabinet is perfectly aligned with the adjacent cabinets. Use shims to make minor adjustments as needed to achieve a flush and seamless fit. Once all the upper cabinets are in place, remove the ledger board and inspect the installation for any gaps or inconsistencies. Fill any gaps with caulk to create a clean and professional finish.
Next, install the base cabinets. These cabinets typically rest on the floor, but it is still essential to secure them to the wall for added stability. Use shims to level the base cabinets, ensuring they are perfectly aligned with each other and with the upper cabinets. Once the base cabinets are level, attach them to the studs using screws. As with the upper cabinets, pre-drill pilot holes to prevent the wood from splitting. Also, consider applying construction adhesive to the back of the base cabinets to provide an additional bond.
Addressing Potential Challenges
Installing kitchen cabinets into plaster walls can present several challenges. One common issue is dealing with uneven walls. Plaster walls are often not perfectly flat, which can make it difficult to achieve a flush fit between the cabinets and the wall. Shims can be used to compensate for minor imperfections, but more significant deviations may require additional work, such as planing down high spots or filling in low spots with patching plaster.
Another challenge is encountering hidden pipes or wiring within the wall. Before drilling or screwing into the wall, it is crucial to be aware of the potential presence of these utilities. Use a stud finder with a wire-detection feature to check for hidden wiring. If you suspect the presence of pipes, consult with a plumber or electrician before proceeding. Damaging a pipe or wire can be costly and dangerous.
Dealing with crumbling plaster is another common issue. When drilling or screwing into plaster, it can sometimes crumble or crack, especially around the edges of the holes. To minimize this, use a sharp drill bit and apply gentle pressure. Avoid using excessive force, as this can exacerbate the problem. If the plaster does crumble, consider using a larger screw with a wider head to provide a more secure hold. You can also use a plaster repair kit to fill in any damaged areas.
Finally, ensure proper safety precautions are taken throughout the installation process. Wear safety glasses to protect your eyes from dust and debris. Use work gloves to protect your hands from sharp edges and splinters. If working at heights, use a sturdy ladder and ensure it is properly positioned. If using power tools, follow the manufacturer's instructions and wear appropriate hearing protection. By following these safety guidelines, you can minimize the risk of accidents and injuries.

News Foshan Hanse Industrial Co Ltd

How To Install Kitchen Cabinets The Home Depot

This Is How You Should Fix Heavy Cabinets To Plasterboard Wall

How To Install Kitchen Cabinets On Plaster Walls Hunker

How To Install Kitchen Cabinets The Home Depot

How To Install Kitchen Cabinets The Wall And Floor With Ease

Fitting Kitchen Units To Plasterboard And Stud Wall Work

How To Install Kitchen Cabinets The Wall And Floor With Ease

How I Closed The Space Above My Cabinets A Erfly House

How To Install Kitchen Cabinets The Wall And Floor With Ease
Related Posts