Adding Trim to Kitchen Cabinets: A Comprehensive Guide
Kitchen cabinets often dictate the overall aesthetic of a kitchen. While the basic structure provides essential storage, the addition of trim can elevate their appearance, transforming them from functional necessities to design focal points. Trim, in this context, refers to decorative moldings and embellishments applied to the cabinet doors, frames, and sides. This process, while seemingly straightforward, requires careful planning, precise execution, and an understanding of various materials and styles.
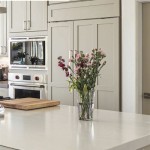
The decision to add trim to kitchen cabinets can stem from several motivations. A primary reason is aesthetic enhancement. Trim can introduce detail, texture, and visual interest to otherwise plain cabinets. It can also be employed to match the cabinets with a specific design theme, such as traditional, modern, or farmhouse. Furthermore, trim can conceal imperfections, such as gaps or uneven edges, thus improving the overall finish of the cabinets.
The success of adding trim hinges on proper preparation. This includes meticulous planning, accurate measurements, and careful material selection. Neglecting any of these steps can lead to a substandard result, requiring costly corrections and potentially compromising the integrity of the cabinets.
Planning and Design Considerations
The initial phase involves a thorough assessment of the existing kitchen cabinets. The style, color, and condition of the cabinets should be carefully considered. Decisions must be made regarding the type of trim to be used, its size, and its placement. This planning phase directly influences the final aesthetic outcome. The goal is to seamlessly integrate the trim with the existing cabinets, creating a cohesive and visually appealing result.
Several factors influence trim selection. The existing cabinet style is a crucial determinant. For instance, a shaker-style cabinet might benefit from simple, clean-lined trim, while a raised-panel cabinet might accommodate more ornate moldings. The overall kitchen design theme should also be considered. A modern kitchen might call for minimalist trim, while a traditional kitchen might incorporate fluted pilasters or crown molding.
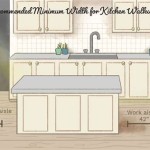
The size and placement of the trim are equally important. Overly large trim can overwhelm smaller cabinets, while undersized trim might be visually insignificant. The placement should complement the cabinet's design and enhance its features. Common placements include along the edges of the cabinet doors, around the frame, or at the top and bottom of the cabinet.
Visualizing the final result is often helpful. This can be achieved through sketching, using design software, or creating mock-ups with sample pieces of trim. Such visualization aids in preventing unforeseen issues and ensuring satisfaction with the end product. This phase avoids costly errors and allows for design adjustments before material purchase and installation.
Materials and Tools Required
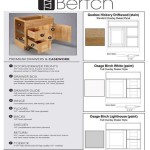
The selection of appropriate materials is paramount to the longevity and appearance of the trimmed cabinets. Common materials include wood, medium-density fiberboard (MDF), and polymer-based moldings. Each material possesses unique characteristics that make it suitable for specific applications.
Wood trim offers a natural aesthetic and can be stained or painted to match the cabinets. Hardwoods such as maple, oak, and cherry are durable and offer a premium look. Softwoods like pine are more affordable but may be more susceptible to dents and scratches. The grain pattern of the wood should also be considered, as it can significantly impact the final appearance.
MDF is a cost-effective alternative to wood. It is smooth, consistent, and easy to paint. However, MDF is less resistant to moisture than wood and should be sealed properly if used in areas prone to water exposure. MDF is a popular choice for painted cabinets because it provides a smooth, even surface for paint adhesion.
Polymer-based moldings offer durability and moisture resistance. They are often used in areas with high humidity, such as bathrooms and kitchens. Polymer moldings are available in a variety of styles and can be painted to match the cabinets. They are also lighter than wood, making them easier to install.
In addition to the trim material, several tools are essential for the installation process. These include a measuring tape, a miter saw, a nail gun, wood glue, sandpaper, and paint or stain. A measuring tape is crucial for accurately determining the dimensions of the trim pieces. A miter saw is used to make precise angled cuts, ensuring seamless joints. A nail gun secures the trim to the cabinets quickly and efficiently. Wood glue provides added strength and durability. Sandpaper is used to smooth rough edges and prepare the surface for painting or staining. Paint or stain is applied to match the trim to the existing cabinet finish.
Safety equipment, such as safety glasses and gloves, should also be worn during the installation process to protect against potential injuries. Dust masks are recommended when sanding or cutting MDF, as it can produce fine particles that can irritate the respiratory system.
Installation Techniques and Best Practices
Proper installation techniques are essential for achieving a professional-looking result. The process typically involves measuring, cutting, fitting, and securing the trim to the cabinets. Each step requires precision and attention to detail.
Accurate measurements are crucial. The dimensions of the cabinet doors, frames, and sides should be carefully measured to ensure that the trim pieces fit properly. It is often advisable to cut the trim pieces slightly longer than necessary and then trim them down to the exact size. This allows for adjustments and prevents costly errors. Using a sharp pencil and a precise measuring tape is crucial to obtaining accurate measurements.
Cutting the trim requires a miter saw. The saw should be set to the correct angle for the desired joint. Common angles include 45 degrees for corners and 90 degrees for straight cuts. It is important to make clean, precise cuts to ensure that the joints fit together seamlessly. A sharp saw blade is essential for achieving clean cuts. Clamping the trim piece securely to the saw's fence can help prevent it from moving during the cutting process.
Fitting the trim involves dry-fitting each piece before securing it permanently. This allows for adjustments and ensures that the trim fits properly. The trim pieces should be aligned carefully and any gaps or imperfections should be addressed. Dry-fitting also allows you to visualize the final result and make any necessary adjustments before committing to the installation.
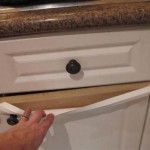
Securing the trim typically involves using wood glue and a nail gun. Wood glue should be applied to the back of the trim piece to provide added strength and durability. The trim piece should then be positioned carefully and secured with nails from the nail gun. The nails should be driven in at a slight angle to prevent them from pulling out. Excess glue should be wiped away with a damp cloth. Fill any nail holes with wood filler and allow it to dry completely before sanding.
Sanding and finishing are the final steps in the installation process. The trim should be sanded smooth with fine-grit sandpaper. This removes any rough edges or imperfections. The trim should be cleaned thoroughly before painting or staining. The paint or stain should be applied in thin, even coats. Multiple coats may be necessary to achieve the desired color and finish. Allow each coat to dry completely before applying the next coat. A clear topcoat can be applied to protect the finish and add durability.
By following these steps and paying close attention to detail, individuals can successfully add trim to their kitchen cabinets and transform their appearance. The increased value and aesthetic appeal makes the entire process a rewarding experience.

From Drab To Fab Adding Trim Cabinets

From Drab To Fab Adding Trim Cabinets

How To Add Trim And Paint Your Laminate Cabinets

Easy And Inexpensive Cabinet Updates Adding Trim To Cabinets Drawers The Rozy Home

How To Add Trim And Paint Your Laminate Cabinets

Adding Shaker Trim To Flat Panel Cabinets Hometalk

Adding Moldings To Your Kitchen Cabinets Remodelando La Casa

From Drab To Fab Adding Trim Cabinets

Kitchen Diy Shaker Style Cabinets Cherished Bliss

Diy Kitchen Cabinet Upgrade With Paint And Crown Molding
Related Posts