Best Way to Paint Kitchen Cabinets Without a Sprayer
Painting kitchen cabinets can significantly transform the look and feel of a kitchen without the substantial expense of replacing them. While spraying cabinets often yields a factory-like finish, it is not always feasible due to space limitations, equipment costs, or a lack of experience. Fortunately, achieving a professional-looking painted cabinet finish is entirely possible without a sprayer. This article will outline the best methods for painting kitchen cabinets using brushes and rollers, focusing on preparation, application techniques, and material selection to ensure a durable and aesthetically pleasing result.
The key to a successful cabinet painting project lies in thorough preparation. Rushing this stage will inevitably lead to imperfections and a less-than-desirable outcome. The preparation process involves cleaning, sanding, priming, and creating a controlled and clean work environment.
Preparation is Paramount
The first step is removing all hardware, including knobs, pulls, hinges, and any other attached elements. Store these items in labeled bags to ensure easy reinstallation later. Next, carefully remove the cabinet doors and drawers from their frames. Lay them out on a protected workspace, such as a drop cloth or plastic sheeting. This allows for easier access and prevents paint drips from affecting other surfaces.
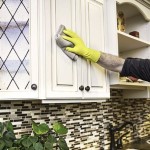
Cleaning is crucial to remove grease, grime, and any other contaminants that could interfere with paint adhesion. Use a degreasing cleaner specifically designed for kitchen surfaces. TSP (trisodium phosphate) is a traditional option, but be sure to wear gloves and eye protection when using it, as it is caustic. Alternatively, phosphate-free alternatives are available and are generally considered safer. Thoroughly scrub all surfaces, paying close attention to areas around handles and cooking surfaces where grease accumulation is most prevalent. Rinse the cabinets with clean water and allow them to dry completely before proceeding.
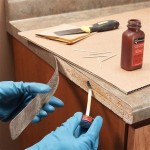
Sanding creates a slightly roughened surface that provides better adhesion for the primer and paint. Use a medium-grit sandpaper (around 120-180 grit) to lightly sand all surfaces. The objective is not to remove the existing finish entirely but to create a "tooth" for the new coating to grip. Pay particular attention to edges and corners. After sanding, remove all sanding dust with a tack cloth or a damp cloth. Ensure the cabinets are completely dry before moving on to priming.
Priming is an essential step that promotes adhesion, seals the surface, and provides a uniform base for the paint. Choose a high-quality primer specifically designed for cabinets. Consider a bonding primer if you are painting over a glossy or particularly slick surface. Apply the primer in thin, even coats using a brush and roller. A brush is ideal for detailed areas and corners, while a roller provides a smooth finish on larger surfaces. Allow the primer to dry completely according to the manufacturer's instructions before proceeding to the next step. Lightly sand the primed surface with a fine-grit sandpaper (around 220 grit) to remove any imperfections and create an even smoother surface. Again, remove all sanding dust before applying the paint.
Finally, create a clean and well-ventilated workspace. Cover surrounding surfaces with drop cloths or plastic sheeting to protect them from paint splatters. Good ventilation is crucial for allowing the paint to dry properly and for minimizing exposure to paint fumes.
Selecting the Right Materials and Tools
Choosing the correct paint and applying it with the appropriate tools significantly impacts the final result. Selecting high-quality materials ensures a durable and aesthetically pleasing finish that will withstand the rigors of daily kitchen use.
For cabinet painting, alkyd or acrylic enamel paints are generally recommended. Alkyd paints offer excellent durability and a hard, smooth finish, but they can have a strong odor and require mineral spirits for cleanup. Acrylic enamel paints are water-based, low-odor, and easy to clean up with soap and water. They are also more flexible than alkyd paints, which can help prevent cracking and chipping. Consider a paint that is specifically formulated for cabinets and furniture for improved durability and adhesion.
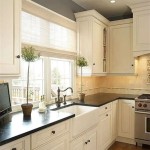
The sheen level of the paint also affects the appearance and durability. Semi-gloss or gloss finishes are commonly used for kitchen cabinets because they are easy to clean and resistant to moisture. However, they also tend to highlight imperfections more than matte or satin finishes. A satin or eggshell finish can provide a more subtle look while still being relatively easy to clean. Ultimately, the choice of sheen level depends on personal preference and the overall aesthetic of the kitchen.
The choice of brushes and rollers is equally important. Invest in high-quality brushes with synthetic bristles. Synthetic bristles are less likely to leave brushstrokes than natural bristles and are better suited for water-based paints. Choose a brush size that is appropriate for the task at hand. A smaller brush (1-2 inches) is ideal for detailed areas, while a larger brush (2-3 inches) can be used for larger surfaces.
For rollers, use a foam roller or a microfiber roller with a short nap (1/4 inch or less). These rollers provide a smooth, even finish and minimize the appearance of roller stipple. Avoid using rollers with a long nap, as they can leave a textured finish. Have a few rollers on hand, as they may become saturated with paint or primer and need to be replaced.
In addition to brushes and rollers, other essential tools include paint trays, liners, painter's tape, sandpaper (various grits), a tack cloth, a putty knife (for filling holes), and a screwdriver (for removing hardware). Having all the necessary tools on hand before starting the project will help to ensure a smooth and efficient workflow.
Application Techniques for a Professional Finish
Proper application techniques are vital for achieving a smooth, even, and professional-looking paint finish on kitchen cabinets when not using a sprayer. Applying thin, even coats and paying attention to detail are key to minimizing brushstrokes and achieving a durable, long-lasting result.
Begin by applying painter's tape to any areas that you do not want to paint, such as the inside edges of the cabinet frames or the walls surrounding the cabinets. Use a high-quality painter's tape that will not leave residue or damage the existing finish. Press the tape firmly against the surface to create a tight seal.
When painting the cabinet doors and drawer fronts, start by painting the edges and any recessed areas with a brush. Use a small brush to get into tight corners and crevices. Then, use a roller to paint the larger flat surfaces. Apply the paint in thin, even coats, overlapping each stroke slightly. Avoid applying too much paint at once, as this can lead to drips and runs.
Use a "layoff" technique to minimize brushstrokes. After applying the paint with a brush, lightly drag the brush over the surface in long, smooth strokes to blend the paint and eliminate any visible brushstrokes. Similarly, after applying the paint with a roller, lightly roll over the surface in a single direction to smooth out the finish. This technique helps to create a uniform and professional-looking appearance.
Allow each coat of paint to dry completely according to the manufacturer's instructions before applying the next coat. Lightly sand the surface with a fine-grit sandpaper (around 220 grit) between coats to remove any imperfections and create an even smoother surface. Be sure to remove all sanding dust before applying the next coat of paint.
Apply at least two coats of paint to ensure adequate coverage and durability. In some cases, a third coat may be necessary, especially if you are painting over a dark color with a light color. Be patient and take your time, as rushing the process will only lead to a less-than-desirable result.
After the final coat of paint has dried completely, carefully remove the painter's tape. Use a utility knife to score the edge of the tape before pulling it off, which will help to prevent the paint from chipping. Reinstall the hardware and reattach the cabinet doors and drawers to the frames. Ensure that all hardware is properly tightened to prevent the doors and drawers from sagging or sticking.

How To Paint Kitchen Cabinets Without Fancy Equipment

How To Paint Your Kitchen Cabinets The Best Way Without A Sprayer

How To Paint Your Kitchen Cabinets The Best Way Without A Sprayer

Painting Melamine Or Laminate Cabinets Without A Paint Sprayer

How To Paint Kitchen Cabinets Without Fancy Equipment

How To Paint Kitchen Cabinets Like The Pros

Painting Melamine Or Laminate Cabinets Without A Paint Sprayer

How To Paint Cabinets And Get Pro Results Without A Sprayer Hartley Home

How To Paint Cabinets And Get Pro Results Without A Sprayer Hartley Home

How To Paint Kitchen Cabinets Without Sanding Or Priming
Related Posts