DIY Kitchen Cabinets: A Comprehensive Guide
The allure of a custom kitchen, tailored perfectly to individual needs and aesthetic preferences, is undeniable. However, the cost associated with commissioning professional cabinetry can be substantial. DIY kitchen cabinets present a compelling alternative, offering a pathway to achieving a bespoke kitchen design while managing expenses and experiencing the satisfaction of hands-on creation.
This article provides a comprehensive overview of the DIY kitchen cabinet process, covering essential considerations, materials, construction techniques, and installation guidelines. The aim is to equip individuals with the knowledge necessary to undertake a DIY kitchen cabinet project successfully.
Planning and Design: The Foundation of a Successful Project
Before any material is cut or any joint is assembled, a meticulous planning and design phase is paramount. This stage involves a thorough assessment of the existing kitchen space, the desired layout, and the specific storage needs. Accurate measurements are crucial; any discrepancies at this stage can lead to significant problems later in the construction process.
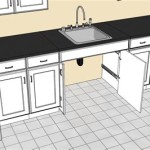
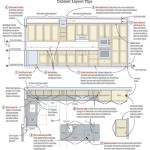
Begin by creating a detailed floor plan of the kitchen, noting the locations of appliances, plumbing, electrical outlets, and windows. Consider the existing traffic flow and how the new cabinets will impact movement within the space. Based on this assessment, conceptualize the desired layout, taking into account factors such as the work triangle (the relationship between the sink, refrigerator, and stove) and accessibility for users of all physical abilities.
Next, determine the specific types and sizes of cabinets required. Standard cabinet dimensions are readily available as a starting point, but customization is one of the primary advantages of DIY cabinetry. Consider incorporating features such as pull-out shelves, spice racks, and drawer organizers to enhance functionality. Careful consideration should be given to the types of doors and drawer fronts preferred, as these elements significantly impact the overall aesthetic.
Once the basic design is finalized, it is essential to create detailed drawings or utilize CAD software to visualize the finished product. These drawings should include precise measurements for each cabinet component, as well as details about joinery methods and hardware placement. This blueprint will serve as a crucial reference throughout the construction process, minimizing the risk of errors and ensuring consistency.
Furthermore, during the planning phase, a budget should be established, outlining the estimated costs for materials, hardware, and tools. This will help to avoid overspending and ensure that the project remains financially feasible.
Material Selection: Choosing the Right Building Blocks
The selection of appropriate materials is critical to the durability, aesthetics, and overall success of DIY kitchen cabinets. A variety of options are available, each with its own advantages and disadvantages in terms of cost, workability, and appearance.
Plywood is a popular choice for cabinet boxes due to its strength, stability, and affordability. Cabinet-grade plywood, characterized by a smooth, void-free surface, is generally preferred. Hardwood plywood, with a hardwood veneer on the exterior, offers an attractive appearance suitable for staining or painting. Softwood plywood is a more economical option but may require more extensive preparation before finishing.
Solid wood is often used for cabinet doors and drawer fronts, providing a classic and durable finish. Hardwoods such as maple, oak, cherry, and walnut are commonly selected for their beauty and resistance to wear and tear. Softwoods such as pine are less expensive but may be more prone to denting and scratching. The choice of wood species will significantly impact the overall look and feel of the kitchen.
Medium-density fiberboard (MDF) is a manufactured wood product that is smooth, stable, and easy to paint. It is often used for cabinet doors and panels, particularly those with intricate designs. However, MDF is susceptible to moisture damage and should not be used in areas that are frequently exposed to water.
Other materials to consider include hardware such as hinges, drawer slides, and pulls. These components should be selected based on their durability, functionality, and aesthetic appeal. High-quality hardware will contribute to the longevity and smooth operation of the cabinets.
Finally, remember finishing materials play a critical role in protecting the materials and achieving the desired aesthetics. Primer, paint, stain, and sealant choices will influence the look and longevity of the cabinets. Proper application and curing are essential for a professional-looking finish.
Construction Techniques: Bringing the Design to Life
The construction of DIY kitchen cabinets involves a variety of woodworking techniques, including cutting, joining, assembling, and finishing. A basic understanding of these techniques is essential for achieving a professional-quality result.
Accurate cutting is paramount. Using precise cutting tools, such as a table saw or circular saw with a guide, ensures that all cabinet components are dimensionally accurate. A miter saw is useful for cutting angles for door and drawer frames. It is advisable to cut slightly oversized pieces initially and then trim them to the exact dimensions required.
Various joinery methods can be employed to assemble the cabinet boxes. Common options include butt joints, rabbet joints, dado joints, and pocket screw joints. Butt joints are the simplest but require the use of screws or nails for added strength. Rabbet joints and dado joints provide more surface area for gluing and create a stronger connection. Pocket screw joints are a popular option for DIY projects, as they are relatively easy to execute and create a strong, hidden joint.
After the cabinet boxes are assembled, the doors and drawer fronts can be constructed. This typically involves creating a frame-and-panel structure, with the frame constructed from solid wood and the panel made from plywood or MDF. The frame members are typically joined using mortise-and-tenon joints or cope-and-stick joints. The panel is then inserted into a groove in the frame.
Once the doors and drawer fronts are assembled, they can be attached to the cabinet boxes using hinges and drawer slides. The placement of these components should be carefully measured and marked to ensure proper alignment and smooth operation. Adjustable hinges and drawer slides allow for fine-tuning after installation.
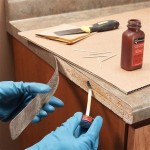
The final step in the construction process is finishing. This involves sanding the surfaces smooth, applying primer, and then applying paint, stain, or other desired finishes. Multiple coats may be required to achieve the desired level of coverage and durability. Proper ventilation is essential when working with finishing materials.
Installation: Securing the Cabinets in Place
The installation of DIY kitchen cabinets is a critical step that requires careful planning and execution. A level and plumb installation is essential for ensuring the proper function and longevity of the cabinets.
Begin by locating and marking the wall studs. The cabinets will need to be securely attached to the studs to ensure stability. Use a stud finder to locate the studs and mark their positions on the wall. It is also important to check for any electrical wiring or plumbing pipes behind the wall before driving screws.
Before installing the cabinets, ensure that the floor is level. If the floor is uneven, shims can be used to level the base cabinets. Place the shims underneath the cabinet boxes, checking the level with a spirit level. Once the cabinets are level, secure them to the wall studs with screws.
When installing wall cabinets, use a temporary support system, such as a ledger board, to hold the cabinets in place while they are being attached to the wall. This will prevent the cabinets from shifting or falling during installation. Ensure that the cabinets are level and plumb before securing them to the wall studs.
After the cabinets are installed, the doors and drawer fronts can be attached. Adjust the hinges and drawer slides to ensure that the doors and drawers open and close smoothly. Install the pulls and knobs. Fill nail holes with wood filler and touch up with paint or stain. Caulk any gaps between the cabinets and the walls or countertops to create a seamless finish.
Finally, install countertops, sinks, and appliances. These components should be installed according to the manufacturer's instructions. Ensure that all connections are secure and properly sealed.
By carefully following these steps, individuals can successfully install their DIY kitchen cabinets and enjoy a custom-designed kitchen that meets their specific needs and aesthetic preferences. With the planning and the tools, DIY kitchen cabinets can become a reality.

21 Diy Kitchen Cabinets Ideas Plans That Are Easy To Build Building Cabinet New

21 Diy Kitchen Cabinets Ideas Plans That Are Easy To Build Cupboards Farmhouse

Diy Budget Open Kitchen Cabinet You Can Build In A Weekend The Ponds Farmhouse

Diy Kitchen Cabinets 25 And Easy Ideas For An Update Joyful Derivatives

Kitchen Cabinet Designs For Contemporary Cooking Spaces

An Honest Review Of My Diy Kitchen Cabinets Two Years Later

Diy Kitchen Cabinets 25 And Easy Ideas For An Update Joyful Derivatives

Diy Rustic Industrial Cabinet Doors Tutorial Cherished Bliss

30 Kitchen Cabinet Add Ons You Can Diy Family Handyman

Diy Budget Open Kitchen Cabinets Build Your Own In A Weekend
Related Posts