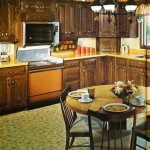
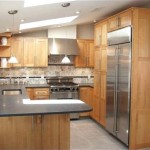
How To Design, Build, and Install Your Own Kitchen Cabinets
Undertaking a do-it-yourself (DIY) kitchen cabinet project is a significant endeavor that can yield substantial cost savings and offer a high degree of customization. However, it requires meticulous planning, a reasonable level of woodworking skill, and a comprehensive understanding of cabinet construction principles. This article details a step-by-step guide to successfully designing, building, and installing your own kitchen cabinets.
Before commencing any physical work, it is crucial to establish a clear vision for the finished project. This involves assessing your existing kitchen space, determining your storage needs, and selecting a style that complements your overall home aesthetic. A haphazard approach can lead to inefficient use of space and a final product that fails to meet your functional requirements.
1. Planning and Design Phase
The initial stage involves conducting a thorough assessment of the existing kitchen layout. Measure the available space with precision. This includes wall lengths, ceiling height, and locations of existing plumbing, electrical outlets, and windows. Generate a detailed scale drawing of the kitchen. Accurate measurements are paramount for determining the size and configuration of the cabinets. Ensure that all measurements are documented accurately and double-checked to avoid errors later in the construction process.
Next, consider your storage needs. Analyze the items you currently store in your kitchen and determine the optimal cabinet configurations for each. For instance, larger items like pots and pans may require deeper cabinets or pull-out shelves. Consider incorporating specialized storage solutions such as spice racks, cutlery dividers, and waste pull-outs to maximize efficiency. Think about accessibility. Determine the optimal height of base and upper cabinets to ensure comfortable reach for all users.
After assessing the spatial and storage requirements, it is time to select a cabinet style. The two primary styles are framed and frameless (also known as European-style) cabinets. Framed cabinets feature a face frame that is attached to the cabinet box, providing additional stability and a traditional aesthetic. Frameless cabinets, on the other hand, have a sleek, modern appearance with doors and drawers attached directly to the cabinet box. Each style offers distinct advantages and disadvantages in terms of construction complexity, aesthetics, and cost. Framed cabinets are generally considered easier for beginners to construct, while frameless cabinets offer more usable interior space. Select a style that aligns with your skill level and design preferences.
Utilizing design software can be beneficial in visualizing the finished kitchen. Several free or low-cost options are available that allow you to create 3D renderings of your kitchen with your custom cabinets. This provides an opportunity to experiment with different layouts, materials, and finishes before committing to the construction phase. Some software programs can also generate detailed cut lists, streamlining the material acquisition process.
Once the overall design is finalized, create detailed shop drawings for each individual cabinet. These drawings should include dimensions, material specifications, and joinery details. This is crucial for ensuring accuracy and consistency throughout the construction process. Consider using a standardized system for labeling each cabinet to avoid confusion during assembly and installation.
2. Construction Phase
After the design phase is completed, the next stage involves selecting the appropriate materials. Commonly used materials for cabinet construction include plywood, medium-density fiberboard (MDF), and solid wood. Plywood is a durable and stable option for cabinet boxes, while MDF provides a smooth surface for painting. Solid wood is often used for face frames, doors, and drawer fronts to add a touch of elegance and durability. The choice of material will depend on your budget, aesthetic preferences, and the desired level of durability.
Once the materials are selected, create a comprehensive cut list based on the shop drawings. A cut list specifies the exact dimensions of each piece of material required for the project. Accurate cutting is essential for ensuring that the cabinets fit together properly. Invest in high-quality cutting tools, such as a table saw and a miter saw, to achieve precise cuts. If you lack experience with these tools, consider practicing on scrap wood before cutting the actual cabinet components.
Begin by constructing the cabinet boxes. Assemble the sides, top, bottom, and back panels using screws and wood glue. Ensure that the corners are square and that the joints are tight. Clamping the components together during assembly is crucial for achieving a strong and durable cabinet box. After the glue has dried, reinforce the joints with screws for added strength. For framed cabinets, attach the face frame to the cabinet box using glue and nails or screws. The face frame provides a decorative element and adds structural integrity to the cabinet.
Next, construct the doors and drawer fronts. Consider the style of door you want to use, such as raised panel, flat panel, or shaker style. Cut the components to the required dimensions and assemble them using joinery techniques such as mortise and tenon, cope and stick, or rabbet joints. Ensure that the doors and drawer fronts are square and that the joints are tight. Sand the surfaces smooth and prepare them for finishing.
Install the hardware, including hinges, drawer slides, and pulls. Choose high-quality hardware that is appropriate for the weight and size of the doors and drawers. Proper installation of the hardware is essential for ensuring smooth and reliable operation. Consider using templates or jigs to ensure accurate and consistent placement of the hardware.
Sanding is a critical step in preparing the cabinets for finishing. Use progressively finer grits of sandpaper to achieve a smooth and even surface. Pay particular attention to edges and corners to ensure that they are free of sharp edges or splinters. After sanding, remove all dust and debris with a vacuum cleaner and a tack cloth.
Apply the desired finish to the cabinets. Common finishing options include paint, stain, and clear coat. Choose a finish that is durable and resistant to moisture and stains. Apply multiple coats of finish, allowing each coat to dry completely before applying the next. Sand lightly between coats to achieve a smooth and even finish. Consider using a sprayer for a professional-looking finish, but be aware that spraying requires proper ventilation and safety precautions.
3. Installation Phase
Before commencing the installation process, ensure that the walls are plumb and level. Use a level to check the walls and make any necessary adjustments with shims. This is crucial for ensuring that the cabinets are installed properly and that the doors and drawers operate smoothly. Locate and mark the wall studs to provide secure attachment points for the cabinets. A stud finder can be used to locate the studs behind the drywall.
Begin by installing the upper cabinets. Lift the cabinets into place and secure them to the wall studs with screws. Use shims to ensure that the cabinets are level and plumb. Check the alignment of the cabinets with a level and make any necessary adjustments. After the upper cabinets are installed, proceed to install the base cabinets. Set the base cabinets in place and secure them to the wall studs with screws. Again, use shims to ensure that the cabinets are level and plumb. Check the alignment of the cabinets with a level and make any necessary adjustments.
After all the cabinets are installed, attach the countertops. Choose a countertop material that is appropriate for your budget and aesthetic preferences. Common countertop materials include laminate, granite, quartz, and solid surface. Follow the manufacturer's instructions for installing the countertops. Ensure that the countertops are level and securely attached to the cabinets.
Install the backsplashes. Backsplashes protect the walls from water damage and add a decorative element to the kitchen. Choose a backsplash material that complements the cabinets and countertops. Common backsplash materials include tile, glass, and stainless steel. Apply adhesive to the back of the backsplash and press it firmly against the wall. Grout the joints between the tiles and wipe away any excess grout.
Connect the plumbing and electrical fixtures. Hire a qualified plumber and electrician to connect the sink, faucet, dishwasher, and any other appliances that require plumbing or electrical connections. Ensure that all connections are made according to local codes and regulations.
Finally, install the finishing touches, such as cabinet pulls, knobs, and trim. These details can make a significant difference in the overall appearance of the kitchen. Choose hardware that complements the cabinets and countertops and that is comfortable to use. Install the trim to conceal any gaps or imperfections between the cabinets and the walls or ceiling.
Throughout the entire process, prioritize safety. Wear appropriate personal protective equipment, such as safety glasses, gloves, and a dust mask. Use power tools with caution and follow the manufacturer's instructions carefully. Work in a well-ventilated area to avoid inhaling dust or fumes. If you are not comfortable with any aspect of the project, consider hiring a professional.
By following these steps meticulously and exercising patience and attention to detail, a homeowner can successfully construct and install their own kitchen cabinets, achieving a customized and cost-effective solution for their kitchen renovation needs.

Diy Budget Open Kitchen Cabinets Build Your Own In A Weekend

Diy Budget Open Kitchen Cabinets Build Your Own In A Weekend

22 Easy Diy Kitchen Cabinets With Free Step By Plans Building Remodeling Projects

How To Build Cabinets The Complete Guide Houseful Of Handmade

30 Kitchen Cabinet Add Ons You Can Diy Family Handyman

How To Make Diy Kitchen Cabinets

Diy Kitchen Cabinets Made From Only Plywood

Kitchen Base Cabinets 101 Ana White

How To Build Your Own Kitchen Cabinets Building Diy New

Homemade Modern Ep86 Kitchen Cabinets