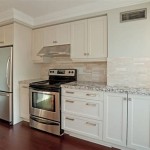
How To Stain White Kitchen Cabinets
Staining white kitchen cabinets presents a unique aesthetic challenge compared to staining bare wood. White painted surfaces require careful preparation and the selection of appropriate staining techniques to achieve the desired result. This article provides a comprehensive guide to staining white kitchen cabinets, covering necessary materials, surface preparation, staining methods, and finishing options.
Understanding the Limitations of Staining White Paint
Before embarking on the task, it's crucial to understand that staining white kitchen cabinets is not the same as traditional wood staining. Paint, unlike wood, is not porous. The stain won't penetrate the existing paint layer. Instead, the stain will essentially act as a glaze, sitting on top of the paint. This means the final look will be a subtle wash of color rather than a deep, rich stain. This effect can be highly desirable, creating an aged or distressed appearance, but it's important to be aware of these limitations to manage expectations.
Furthermore, the type of paint used on the cabinets will influence how well the stain adheres and the kind of effect achievable. Certain paints are more receptive to glazes and stains than others. Ideally, cabinets should be painted with a paint that provides a slightly textured surface for the stain to grip onto. High-gloss paints are inherently less receptive and will require more extensive preparation. Thorough research into the existing paint type is recommended before proceeding.
Materials and Tools Required
Successful staining hinges on using the right materials and tools. Gather the following items before starting:
*Cleaning Supplies:
Trisodium phosphate (TSP) or a similar degreaser, clean cloths, sponges, and water. *Sandpaper:
Fine-grit sandpaper (220-grit or higher) for de-glossing the painted surface. *Painter's Tape:
For protecting surrounding surfaces and creating clean lines. *Stain:
Gel stain is often preferred for painted surfaces due to its thicker consistency, which helps it adhere better and provides more control over the color intensity. Oil-based stains or water-based stains formulated as glazes are also suitable options. Select a stain color that complements the existing kitchen decor. *Application Tools:
High-quality brushes (either natural bristle or synthetic, depending on the type of stain), foam brushes for detail work, lint-free rags, and a stain applicator pad. *Topcoat:
A clear topcoat (polyurethane, lacquer, or varnish) to protect the stained surface and add durability. Choose a finish (matte, satin, semi-gloss, or gloss) based on the desired sheen. *Safety Gear:
Eye protection, gloves, and a respirator or mask to protect against dust and fumes. *Drop Cloths:
To protect flooring and work surfaces from spills and splatters. *Optional:
Wood conditioner (specifically formulated for painted surfaces) to improve stain absorption and evenness, although this is not always necessary.Surface Preparation: The Key to Adhesion and Evenness
Proper surface preparation is perhaps the most critical step in achieving a professional-looking stained finish. Neglecting this stage can lead to uneven color, poor adhesion, and a generally unsatisfactory outcome. Follow these steps meticulously:
1. Cleaning:
Thoroughly clean the cabinets to remove any dirt, grease, grime, or wax buildup. Use TSP or a suitable degreaser mixed with water according to the manufacturer's instructions. Scrub the surfaces with a sponge or cloth, paying particular attention to areas around knobs and handles. Rinse thoroughly with clean water and allow the cabinets to dry completely. Residual dirt or grease will prevent the stain from adhering properly, resulting in blotchy or uneven color.2. De-Glossing:
Since paint is not porous, it’s essential to create a slightly textured surface for the stain to grip onto. Lightly sand the entire surface of the cabinets using fine-grit sandpaper (220-grit or higher). The goal is not to remove the paint, but rather to dull the shine and create microscopic scratches that the stain can adhere to. Use a sanding block for flat surfaces and flexible sandpaper for curved or detailed areas. Be careful not to sand too aggressively, as this could damage the paint layer and expose the substrate beneath. Wipe away sanding dust with a tack cloth or damp cloth after sanding.3. Masking:
Use painter's tape to protect any areas that you don't want to be stained, such as walls, countertops, or the interior edges of cabinet frames. Apply the tape carefully, ensuring a clean, straight line. Press the tape firmly against the surface to prevent stain from bleeding underneath. This step is crucial for achieving a professional-looking finish.4. Priming (Optional):
If the existing paint is in poor condition or if you're making a drastic color change, consider applying a primer specifically designed for painted surfaces. A primer will create a uniform base for the stain and improve adhesion. Choose a primer that is compatible with both the existing paint and the stain you're using. Allow the primer to dry completely according to the manufacturer's instructions before proceeding to the staining stage.Staining Techniques for White Kitchen Cabinets
Several staining techniques can be used to achieve different aesthetic effects on white kitchen cabinets. The choice of technique will depend on the desired look and the level of control required.
1. Brush Application:
This is the most common and straightforward method. Dip a brush into the stain and apply a thin, even coat to the cabinet surface, working in the direction of the grain (if applicable). Avoid applying too much stain at once, as this can lead to drips and runs. Immediately after applying the stain, use a clean, lint-free rag to wipe away the excess. The amount of stain you wipe away will determine the intensity of the color. For a lighter look, wipe away more stain; for a darker look, wipe away less. Work in small sections to maintain control and prevent the stain from drying unevenly.2. Rag Application:
This method involves applying the stain with a lint-free rag. Dip the rag into the stain and wring out the excess. Then, rub the stain onto the cabinet surface in a circular motion. This technique is particularly useful for creating a distressed or weathered look. It allows for more control over the application process and can be used to achieve subtle variations in color. As with brush application, wipe away the excess stain with a clean rag immediately after applying it.3. Spray Application:
Using a sprayer (HVLP or airless) can provide a smooth, even finish. However, this method requires more skill and experience. Thin the stain according to the sprayer manufacturer's instructions and apply several thin coats, allowing each coat to dry before applying the next. Spraying is ideal for covering large areas quickly and efficiently, but it's essential to mask off surrounding surfaces to prevent overspray.4. Dry Brushing:
This technique involves using a dry brush with a small amount of stain on the very tips of the bristles. The brush is then lightly dragged across the cabinet surface, leaving behind a subtle, textured effect. Dry brushing is excellent for highlighting details and creating a rustic or aged appearance. It requires a light touch and careful control to avoid applying too much stain.Applying a Protective Topcoat
Once the stain has dried completely (allow sufficient drying time as specified by the stain manufacturer), it's essential to apply a protective topcoat. The topcoat will seal the stain, prevent it from fading or chipping, and provide a durable, easy-to-clean surface. Choose a topcoat that is compatible with the type of stain you used and the desired sheen (matte, satin, semi-gloss, or gloss).
1. Application:
Apply the topcoat using a brush, sprayer, or lint-free rag, depending on the type of topcoat and the desired finish. Apply thin, even coats, allowing each coat to dry completely before applying the next. Follow the manufacturer's instructions for drying times and application techniques.2. Sanding:
After the first coat of topcoat has dried, lightly sand it with very fine-grit sandpaper (400-grit or higher) to remove any imperfections or brush marks. Wipe away the sanding dust with a tack cloth before applying the second coat. Sanding between coats will create a smoother, more professional-looking finish.3. Number of Coats:
Apply at least two coats of topcoat for adequate protection. For high-use areas, such as around the sink or stove, consider applying three or more coats. Allow the final coat to dry completely before reassembling the cabinets and using the kitchen.
The Best White Wood Stain Options

Farmhouse Check In A What We Chose Edition Stained Wood Or Painted Cabinets Emily Henderson

Painting Cabinets White Should You Do It Boston Area Painters Big Dog

Painted Vs Stained Cabinets How To Compare When Use Both

How To Glaze Kitchen Cabinets Diyer S Guide Bob Vila

The New Cabinet Stain Colour For Kitchens Trends Wood

Kitchen Renovation How To Mix White And Stained Oak Cabinets Home Bunch Interior Design Ideas

Decorating With Stained Trim Cabinetry Lindsey Putzier

Kitchen Renovation How To Mix White And Stained Oak Cabinets Home Bunch Interior Design Ideas

Perfect Color For Cabinets Stained Gray White On Maple Eclectic Kitchen Pantry Design
Related Posts