Paint My Kitchen Cupboard Doors: A Comprehensive Guide
Kitchen cupboard doors, over time, can become worn, outdated, or simply no longer align with evolving aesthetic preferences. Replacing an entire kitchen cabinet system can be a costly and disruptive undertaking. An alternative solution, often more economically viable and environmentally friendly, is to repaint the existing cupboard doors. This approach allows for a significant transformation of the kitchen's appearance without the extensive labor and expenditure associated with a full renovation.
The success of a cupboard door painting project hinges on meticulous planning, proper preparation, and the selection of appropriate materials. A poorly executed paint job can result in a less-than-desirable finish, potentially diminishing the overall value and appeal of the kitchen. Therefore, a thorough understanding of the process, from initial assessment to final application, is crucial.
Key Point 1: Assessing the Existing Cabinet Doors
Before embarking on the painting process, a comprehensive assessment of the existing cupboard doors is essential. This assessment should focus on several key aspects to determine the most appropriate course of action.
The first consideration is the material composition of the doors. Common materials include solid wood, wood veneer, laminate, and MDF (Medium Density Fiberboard). Each material requires different preparation techniques and paint types for optimal adhesion and durability. Solid wood doors, for example, may require more extensive sanding and priming than laminate doors. Laminate, known for its smooth, non-porous surface, presents a particular challenge for paint adhesion and necessitates the use of specialized primers.
The condition of the doors is another critical factor. Examine the doors for signs of damage, such as scratches, dents, chips, or water damage. Minor imperfections can often be repaired with wood filler or patching compounds. More significant damage may require professional repair or, in extreme cases, door replacement. Identifying and addressing these issues prior to painting ensures a smooth and uniform finish.
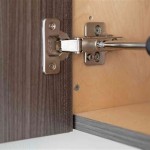
Hardware removal is a necessary step. Remove all knobs, handles, hinges, and other hardware. This prevents paint from accumulating on these elements and allows for a clean, professional paint job. Consider marking the location of the hardware to facilitate easy reinstallation after painting. Cleaning the hardware thoroughly is also recommended, as this is an opportune time to freshen up these frequently used elements.
Key Point 2: Preparation is Paramount
Proper preparation is arguably the most important step in achieving a durable and aesthetically pleasing finish. Neglecting this stage can lead to paint adhesion problems, uneven surfaces, and a finish that is prone to chipping and peeling. The preparation process involves several distinct steps, each contributing to the overall success of the project.
Cleaning the doors thoroughly is the initial step. Use a degreaser or all-purpose cleaner to remove any grease, dirt, or grime that may have accumulated on the surface. Even seemingly clean doors can harbor oils and residue that can interfere with paint adhesion. Rinse the doors thoroughly with clean water and allow them to dry completely before proceeding.
Sanding is crucial for creating a surface that paint can properly adhere to. The specific grit of sandpaper required depends on the material and condition of the doors. For most surfaces, a medium-grit sandpaper (around 120-150 grit) is sufficient for initial sanding, followed by a finer grit (around 220 grit) for smoothing. Sand in the direction of the wood grain (if applicable) to avoid creating unsightly scratches. For laminate doors, a slightly coarser grit may be necessary to scuff the surface adequately. After sanding, remove all dust with a tack cloth or a vacuum cleaner with a brush attachment.
Priming is essential for creating a uniform base for the paint and ensuring optimal adhesion. Select a primer that is specifically designed for the material of the doors. For example, an oil-based primer is generally recommended for wood, while a bonding primer is necessary for laminate. Apply the primer in thin, even coats, following the manufacturer's instructions. Allow the primer to dry completely before proceeding to the next step. Multiple coats of primer may be necessary for heavily stained or porous surfaces.
Filling any imperfections, such as dents, scratches, or chips, is important for achieving a smooth and flawless finish. Use a wood filler or patching compound that is appropriate for the material of the doors. Apply the filler according to the manufacturer's instructions, allowing it to dry completely. Sand the filled areas smooth with fine-grit sandpaper, blending them seamlessly with the surrounding surface. Remove all dust before proceeding to the next step.
Key Point 3: Selecting and Applying the Paint
The choice of paint and its application technique significantly influence the final appearance and durability of the painted cupboard doors. Selecting the right paint type and employing proper application methods are crucial for achieving a professional-looking result.
Choosing the right paint type is paramount. For kitchen cupboards, durable and easy-to-clean paints are essential. Oil-based paints offer excellent durability and a smooth, even finish, but they require longer drying times and emit strong odors. Water-based acrylic paints are a popular choice due to their low odor, fast drying time, and ease of cleanup. They are also more environmentally friendly than oil-based paints. Consider using a paint specifically formulated for cabinets and trim, as these paints are designed to withstand the wear and tear of daily use. Semi-gloss or gloss finishes are generally recommended for kitchen cupboards, as they are more resistant to moisture and easier to clean than matte finishes.
Before painting, ensure the work area is well-ventilated. Protect surrounding surfaces with drop cloths or masking tape. Consider using a paint sprayer for a smooth, even finish, especially for larger projects or intricate door designs. If using a brush, choose a high-quality brush with synthetic bristles. Apply the paint in thin, even coats, working in the direction of the wood grain (if applicable). Avoid applying too much paint at once, as this can lead to drips and runs. Allow each coat to dry completely before applying the next. Lightly sand between coats with fine-grit sandpaper to remove any imperfections and create a smoother surface for subsequent coats.
Applying multiple thin coats is preferable to applying one thick coat. Thin coats dry more evenly and are less likely to result in drips or runs. Two or three thin coats are typically sufficient for achieving full coverage and a durable finish. Allow the final coat to dry completely, according to the manufacturer's instructions, before reinstalling the hardware and reattaching the doors to the cabinets. After the paint has fully cured, clean the doors with a mild soap and water to remove any dust or residue. Avoid using harsh chemicals or abrasive cleaners, as these can damage the paint finish.
Consider using a clear topcoat for added protection and durability. A clear topcoat can help protect the paint from scratches, stains, and other damage. Choose a topcoat that is compatible with the paint type used. Apply the topcoat in thin, even coats, following the manufacturer's instructions. Allow the topcoat to dry completely before using the cabinets.
In summary, successfully painting kitchen cupboard doors requires a meticulous approach, encompassing thorough assessment, meticulous preparation, and careful execution. By paying close attention to these key elements, a significant transformation of the kitchen's aesthetic can be achieved, breathing new life into existing cabinetry and enhancing the overall value of the home.

How I Painted My Kitchen Cupboards On A Budget Dove Cottage

Kitchen Spray Painting The Facelift Company

How To Paint Laminate Kitchen Cabinets Perfect Finish Tips

How To Paint Kitchen Cabinets A Step By Guide Confessions Of Serial Do It Yourselfer

Kitchen Cupboard Paint How To Your Cupboards

Should I Paint My Kitchen Cabinets Helix Painting

My Painted Cabinets Two Years Later The Good Bad Ugly

Step By How To Paint Your Kitchen Cabinets

How To Create A High Gloss Kitchen

Painting Kitchen Cabinets
Related Posts