Painted Kitchen Cabinet Makeovers: Before and After
Kitchen cabinets are a focal point of any kitchen. Their appearance significantly impacts the overall aesthetic and functionality of the space. Over time, cabinets can become outdated, worn, or simply clash with evolving style preferences. Replacing them entirely can be a costly and disruptive undertaking. Instead, many homeowners opt for a painted kitchen cabinet makeover. This approach offers a cost-effective and transformative solution to revitalize the heart of the home.
Painted kitchen cabinet makeovers involve a range of techniques and considerations, from surface preparation and paint selection to hardware upgrades and finishing touches. The visual impact of such a project can be dramatic, taking a tired and uninspiring kitchen and turning it into a modern and welcoming space. This article explores the key aspects of painted kitchen cabinet makeovers, examining the process, potential challenges, and providing insights into achieving professional-looking results. The following sections will detail different stages of preperation, explain the process of choosing the optimal paint, and point out things to consider during the painting process.
The Power of Transformation: Visual Evidence
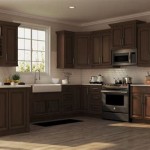
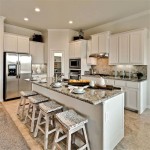
The effectiveness of painted kitchen cabinet makeovers is best illustrated through before-and-after comparisons. Consider kitchens with dated oak cabinets, their golden hues often associated with older design trends. A fresh coat of paint, in a crisp white, a sophisticated gray, or a bold color, immediately modernizes the space. The transformation extends beyond mere aesthetics; it can also enhance the perceived brightness and spaciousness of the kitchen. Dark cabinets, for example, can absorb light and make a room feel smaller. Lighter colors reflect light, creating an airier and more open ambiance.
Beyond color changes, the type of paint finish also contributes to the overall effect. A glossy finish creates a sleek, contemporary look, while a matte finish offers a more subtle, traditional appearance. Hardware upgrades further elevate the transformation. Replacing outdated knobs and pulls with modern designs can add a touch of elegance and sophistication. These subtle changes, combined with a professionally executed paint job, can result in a kitchen that looks and feels entirely new, without the expense and hassle of a complete renovation.
Before embarking on a painted kitchen cabinet makeover, it is important to carefully assess the existing cabinets. The condition of the cabinets will determine the extent of the preparation required. Cabinets with significant damage, such as warped doors or extensively damaged veneer, may require more extensive repairs or even replacement of individual components. However, in most cases, even cabinets with minor imperfections can be successfully refinished with proper preparation and attention to detail.
Preparation is Paramount: Achieving a Lasting Finish
The longevity and appearance of a painted kitchen cabinet makeover hinge on thorough preparation. This stage is often the most time-consuming, but it is crucial for ensuring proper adhesion and a smooth, even finish. The preparation process typically involves several key steps.
First, cabinets must be thoroughly cleaned to remove grease, grime, and any existing coatings. A degreasing cleaner specifically designed for kitchen surfaces is recommended. Scrubbing with a non-abrasive sponge or cloth will help to lift away stubborn residue. It is important to rinse the cabinets thoroughly with clean water to remove any traces of the cleaner.
Next, all hardware, including knobs, pulls, hinges, and drawer slides, should be removed. This prevents paint from getting on the hardware and allows for easier access to all surfaces of the cabinets. If hinges are concealed or difficult to remove, they can be carefully masked off with painter's tape. However, removing them entirely is generally preferable for achieving the best possible results.
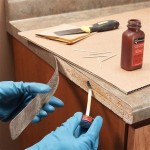
Sanding is a critical step in preparing the cabinets for paint. Sanding roughens the surface, creating a "tooth" that allows the paint to adhere properly. The appropriate grit of sandpaper will depend on the existing finish and the type of wood. For cabinets with a glossy finish, a coarser grit sandpaper may be necessary to break through the existing coating. For raw wood or cabinets with a matte finish, a finer grit sandpaper can be used. It is important to sand evenly and thoroughly, paying particular attention to edges and corners. After sanding, the cabinets should be wiped down with a tack cloth to remove any sanding dust.
Priming is another essential step in achieving a durable and long-lasting finish. Primer seals the wood, prevents bleed-through of tannins or stains, and provides a uniform surface for the paint to adhere to. A high-quality primer specifically designed for cabinets is recommended. Apply the primer in thin, even coats, following the manufacturer's instructions. Allow the primer to dry completely before applying the paint.
For cabinets with imperfections, such as dents, scratches, or cracks, filling these imperfections with wood filler is recommended. Apply the wood filler according to the manufacturer's instructions, allowing it to dry completely before sanding it smooth. Once the wood filler is sanded smooth, prime the filled areas before painting.
Selecting the Right Paint: Durability and Aesthetics
Choosing the right paint is crucial for achieving both the desired aesthetic outcome and a durable, long-lasting finish. Several types of paint are suitable for kitchen cabinets, each with its own advantages and disadvantages. Alkyd or oil-based paints offer excellent durability and a smooth, hard finish. However, they can be more difficult to work with than latex paints, requiring more meticulous preparation and longer drying times. Alkyd paints also tend to yellow over time, particularly in lighter colors.
Latex paints are a popular choice for kitchen cabinets due to their ease of application, low odor, and quick drying time. High-quality acrylic latex paints offer good durability and are available in a wide range of colors and finishes. Water-based paints are also environmentally friendly and easy to clean up with soap and water.
For added durability and stain resistance, consider using a paint specifically formulated for cabinets and furniture. These paints typically contain additives that enhance their hardness and resistance to chipping, scratching, and staining. Some paints also offer self-leveling properties, which help to create a smooth, even finish.
The choice of paint finish also impacts the overall look and feel of the kitchen. Glossy finishes are easy to clean and reflect light, making them a good choice for kitchens that need brightening. However, glossy finishes also tend to highlight imperfections. Semi-gloss finishes offer a good balance between durability and aesthetics. They are easy to clean and offer a subtle sheen. Matte finishes are more forgiving of imperfections and provide a softer, more traditional look. However, they can be more difficult to clean than glossy or semi-gloss finishes.
Before committing to a particular paint color, it is advisable to test it in the kitchen. Paint a small area of a cabinet door or a piece of scrap wood and observe it in different lighting conditions. This will help to ensure that the color looks the way you expect it to and complements the other elements in the kitchen.
Proper application techniques are essential for achieving a professional-looking finish. Whether using a brush, roller, or sprayer, apply the paint in thin, even coats, following the manufacturer's instructions. Avoid over-applying the paint, as this can lead to drips and runs. Allow each coat to dry completely before applying the next coat. Sand lightly between coats with a fine-grit sandpaper to remove any imperfections and create a smooth surface for the next coat of paint.
When using a brush, choose a high-quality brush designed for the type of paint you are using. Use long, even strokes, overlapping each stroke slightly to avoid streaks. When using a roller, choose a roller with a nap that is appropriate for the type of paint you are using. Apply the paint in a "W" pattern, then smooth it out with long, even strokes.
Spraying generally provides the smoothest, most professional-looking finish. However, spraying requires more skill and equipment than brushing or rolling. If using a sprayer, be sure to follow the manufacturer's instructions carefully. Wear appropriate safety gear, including a respirator and eye protection. Practice spraying on a piece of scrap wood before spraying the cabinets.
After applying the final coat of paint, allow it to dry completely before reassembling the cabinets. Reinstall the hardware and adjust the hinges as needed. Clean up any drips or spills immediately. With proper preparation and application, a painted kitchen cabinet makeover can transform a dated kitchen into a stylish and functional space.

20 Pictures Of Before And After Kitchen Makeovers With Cost Painting Cabinets

9 Inspiring Kitchen Cabinet Makeovers Before And After Builder Grade Remodel Small Renovation

Painted Kitchen Cabinet Makeover Tips Perfecting Places

Painted Kitchen Cabinet Ideas And Makeover Reveal The Polka Dot Chair

Diy Painted Oak Kitchen Cabinets Makeover

Painting Kitchen Cabinets Makeover The Stonybrook House

Before After Grey Kitchen Makeover Diy Cabinets Remodel Small Renovation

Kitchen Cabinet Makeover Reveal Remodel Small Renovation

Painted Cabinets Nashville Tn Before And After Photos

35 Awesome Diy Kitchen Makeover Ideas For Creative Juice Inexpensive Cabinets
Related Posts