Essential Aspects of Shaker Style Kitchen Cabinets DIY
Shaker-style kitchen cabinets, known for their simplicity, functionality, and timeless appeal, have become a popular choice among homeowners looking to create a classic and elegant kitchen. Building Shaker-style cabinets yourself can be a rewarding project, offering both cost savings and customization options. Here are some essential aspects to consider when embarking on a DIY Shaker cabinet project:
Design and Planning
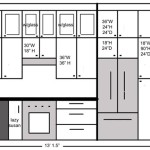
Before starting your project, carefully plan the design and layout of your cabinets. Determine the size and configuration of each cabinet, considering the appliances and storage needs of your kitchen. Sketch out a detailed plan, including dimensions, door styles, and hardware placements.
Materials and Hardware
For shaker-style cabinets, solid wood is the preferred choice, such as maple, oak, or cherry. Ensure the wood is kiln-dried to prevent warping or shrinkage. Other essential materials include plywood for cabinet boxes, hinges, drawer slides, and knobs or handles.
Carcass Construction
The cabinet carcasses form the framework of your cabinets. Use 3/4-inch plywood or furniture-grade plywood cut to the desired dimensions. Assemble the carcasses using wood glue and nails or screws. Ensure the joints are square and secure.
Door and Drawer Construction
Shaker-style doors typically feature a recessed panel surrounded by a frame. Use 1/2-inch or 3/4-inch solid wood for the frame and a 1/4-inch plywood panel. Joint the frame corners using mortise and tenon joints or pocket screws. Drawers are typically made using 1/2-inch plywood for the sides and bottom, with a 1/4-inch plywood drawer front.
Finishing
Sand all exposed surfaces before finishing. Apply a wood conditioner to enhance paint or stain adhesion. Choose a paint or stain that complements your kitchen decor, and apply several thin coats, allowing ample drying time between each coat.
Installation
Install the cabinets using a level and shims to ensure they are square and plumb. Secure the cabinets to the wall for stability. Attach doors and drawers using hinges and drawer slides, and adjust them for proper alignment and operation.
By following these essential aspects, you can successfully build beautiful and functional Shaker-style kitchen cabinets that will enhance the look and feel of your home for years to come.

Diy Shaker Cabinet Doors How To Make Your Own For Less Farmhouseish

Kitchen Diy Shaker Style Cabinets Cherished Bliss

Diy Shaker Cabinet Doors The Easy Way Mimzy Company

Diy Shaker Cabinet Doors How To Make Your Own For Less Farmhouseish

Budget Kitchen Renovation With Diy Shaker Painted Cabinets I

Diy Cabinet End Panels With Shaker Style Trim Average But Inspired

How To Make Shaker Style Kitchen Cabinet Doors On A Budget My Design Rules

Budget Kitchen Renovation With Diy Shaker Painted Cabinets I

Mudroom Update Diy Shaker Cabinet Doors Faux Remodelando La Casa

Diy Shaker Cabinet Door Tutorial Step By Guide
Related Posts